The PIAS suite consists of many modules, each module addresses a specific area of ship design, such as hull form definition, hull form design, extended hydrostatics, intact- and damage stability calculations and resistance and propulsion estimations. In subsequent chapters each module will be elaborated. But first, in this chapter the installation of the program, the main menu, general menu options, and definitions will be addressed.
Installation of PIAS
Installation of PIAS software is started by executing the installation program username.exe, which can be obtained after login in with the Login button on www.sarc.nl. After starting the installation program, you need to agree with the licence agreement, which is shown on screen. Next step is to choose a location for the installation of the program and whether or not a shortcut will be created on the desktop. Hereafter, the PIAS programs are installed in the selected folder and the shortcut may be created.
Installation command line parameters
The installation executable accepts the following command line parameters;
| -s | The PIAS installation is performed without user interaction. |
| -r | PIAS menu is not started automatically by the installer. |
| -path= | PIAS will be installed in the folder specified here. The specified installation path may not contain spaces. |
Example: sarc_en.exe -s -r -path=c:\custominstallpath
System requirements
For the current system requirements for PIAS, please refer to the information on our website www.sarc.nl/system-requirements
(LOCO-)PIAS under Windows 10, 64 bits.
The module Fairway achieves its high efficiency through intensive use of the graphics adapter. The adapter should support at least OpenGL 2.0; which is a standard from 2004 and supported by most cards these days. Although the program doesn't put further requirements on the graphics adapter, the capabilities of modern hardware are fully utilized.
There are exceptional cases in which Fairway exposes weaknesses in the driver software of the graphics adapter, which cause it to malfunction or not work at all. The cases that we know of can be resolved with specific driver settings, or by installing a different version of the driver. Details are discussed in Troubleshooting.
Software protection key
PIAS is protected against unauthorized use by a security device called Codemeter, produced by Wibu systems. It is available in two variants, one with a hardware key, and one working with a (registered and identifiable) computer that acts as license server. Two short video clips are available showing the installation procedure:
While the Codemeter installation and update procedure is described in more detail in Additional installation and update details from the Codemeter software protection. Occasionally, large or slow networks might cause communication with the key to slow down PIAS' operation, so it is advisable to go through this section, as it also describes how to specify the exact location of the computer with the key or license.
Manuals, exercises and information sources
The manuals are available in three incarnations, which are identical by content:
- One PDF file which contains all chapters, and is called PIASmanual_en.pdf for the English version. A PDF-reader is required to open this file.
- HTML pages, viewable with a web browser.
- A help reader, co-installed with PIAS, accessible from each module, which shows directly the module-specific manual section. This reader (from which an example is shown below) contains also the usual functions such as search, select on index words, print etc.
The PDF and HTML versions are available on www.sarc.nl/downloads. The manual is primarily organized per module, so each module has a dedicated manual chapter where the role of the module, and the several functions and tools are being discussed. The role of the manual is to provide background information and support in the use of PIAS. Although quite some design-related subjects are discussed in the manual, it cannot be considered as a course in ship design. Addtionally, this Downloads section also contains a link to PIAS exercises and training material. The novice in PIAS is advised to go through these exercises.
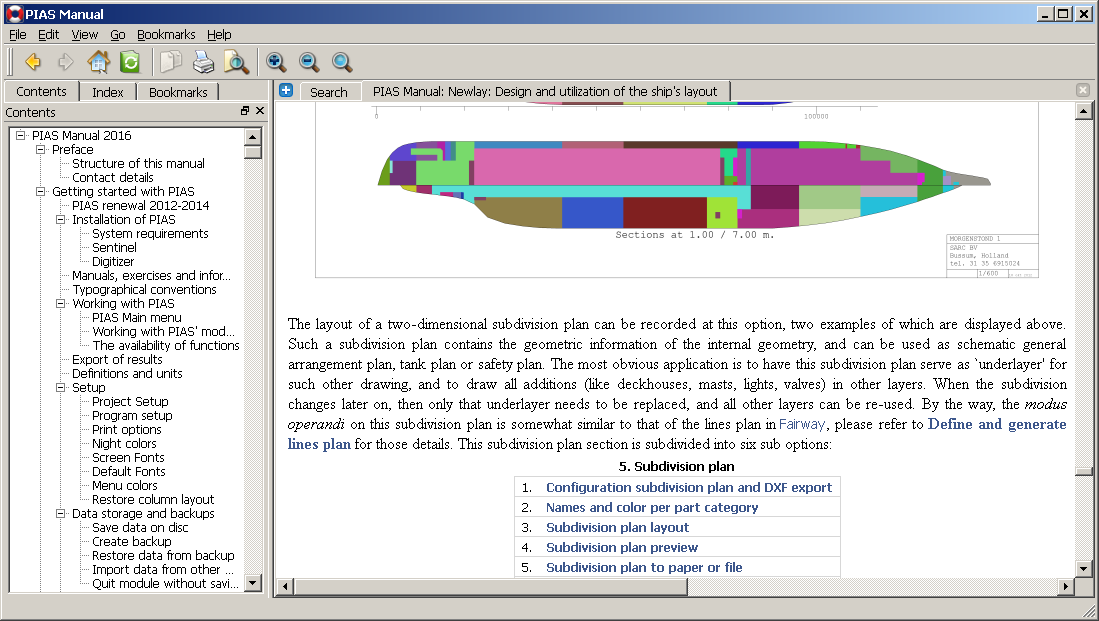
Manual in help reader.
Significant software changes or enhancements are communicated in news messages, which are distributed through different channels:
- All news about modifications and enhancements of PIAS — as well as other SARC related news such as trade fair presence — is placed on website and published in Linkedin group SARC BV.
- Additionally, news on crucial PIAS modifications, for example those who lead to changed calculation results, is send by e-mail, for which you can (un-)subscribe with a mail to
sarc@sarc.nl.
- Approximately once a year the major modifications of PIAS are summarized in a newsletter which is sent by mail to those who subscribed. These newsletters are also collected on the website.
Finally, on a number of subjects which touch PIAS some background references are available, in the shape of papers, as presented on a conference or published in a journal. The majority of these papers is written in English, with an occasional one in Dutch.
Typographical conventions
Text between < > symbols indicates the letter or name of a keyboard key to be pressed, e.g. <Enter>. Key combinations are typeset with a + as in <Ctrl + Q>, and a sequence of key presses is written as e.g. <Alt><C>. A menu option (from the menu bar of the window, or a push button in the window) is indicated as [Option].
Working with PIAS
This section describes the PIAS main menu and how to start a project from there.
PIAS Main menu
PIASmenu shortcut.
When you start PIAS (with the PIASmenu shortcut on your desktop or, for example, by clicking PIASmenu.exe in Windows' Explorer), PIAS' main menu appears:
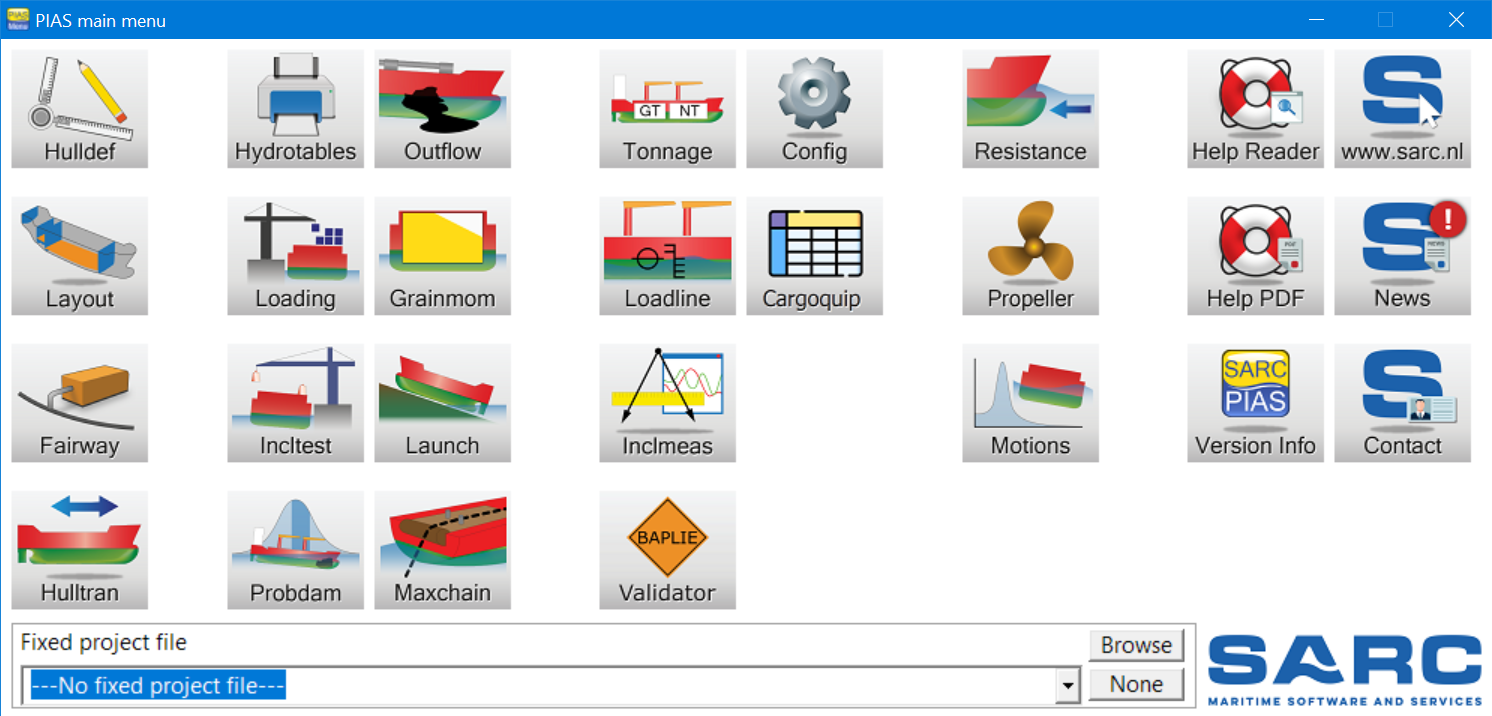
PIAS main menu.
In the main menu, the following actions can be performed:
- You can start a module by double clicking the left mouse button or by hitting <enter> when the mouse pointer is above the module button. Each PIAS module opens in its own window, the standard MS-Windows commands can be applied, such as move, resize, minimize, maximize, restore etc. Also, the menus in upper bar of the module's window act in the standard MS-Windows fashion.
- By clicking the right mouse button, or <F1>, on a module or submenu, the help-reader opens the chapter corresponding to that specific module or submenu.
- At the bottom of the main menu you can specify a fixed project file, which is subsequently used by all modules. Providing a fixed file is optional, if no fixed file is specified each individual module asks for the file to be used. Next to this fixed file field, there are two more buttons: [Browse], this function can be used to browse your folders, and choose a PIAS files, and [None] which indicates you don't want to use a fixed project file.
The main menu consists of buttons which symbolize a module. Their purposes are summarized in the table below.
- Hulldef
- Input of hull-related items, such as an existing body plan, non-watertight openings, special points, appendages, deck line and wind contour.
- Layout
- Input or design of internal shape, such as bulkheads, decks and compartments. Computation of tank sounding tables etc.
- Fairway
- Hull form design, fairing, visualization and export.
- Hulltran
- Hull form transformation.
- Hydrotables
- Computation and output of hydrostatics-related tables, such as hydrostatics, cross-curves, maximum allowable VCG' (intact as well as damaged), deadweight tables and deadweight scale and Van der Ham's trim diagram.
- Loading
- Definition of loading conditions and computation of intact stability, longitudinal strength and (deterministic) damage stability.
- Incltest
- Inclining test or draft survey report.
- Probdam
- Probabilistic damage stability.
- Outflow
- Oil outflow according to MARPOL.
- Grainmom
- Maximum allowable grain heeling moments.
- Launch
- Longitudinal launching.
- Maxchain
- Maximum allowable anchor chain forces for anchor-handling vessels.
- Tonnage
- Calculation of gross and net tonnage.
- loadline
- Freeboard calculation according to the International Convention on load Lines.
- Inclmeas
- Registration and processing of digital inclination measurement.
- Config
- General project setups and configurations.
- Cargoquip
- Definition of cargo equipment.
- Resistance
- Re sistance predictions according to empirical methods.
- Propeller
- Propeller calculations with standard series, for B-series, ducted propellers etc.
- Motions
- Estimation of ship motions.
- Help reader
- A help reader (which is also accessible from each module by pressing <F1>), which shows directly the module-specific manual chapter, also see: Manuals, exercises and information sources.
- Help PDF
- One PDF file which contains all chapters of the PIAS manual. A PDF-reader is required to open this file.
- Version info
- Print the same creation date and revision number of the current version of the software to a preview window, from which it can be printed on paper, or copied & pasted into another document, for example to a stability booklet in order to record the particulars of the software used for the calculations. Copy preferably as image, not as RTF because that can be interpreted differently by the various text editors, which might lead to small layout differences. While as image the entire content, including the rounded frame, is exactly transferred. An example is depicted below. An exclamation mark indicates there is an important update available or that the current version of the software is more than six months old. Because legislation, hardware capacities and opinions about program design the software is subject to permanent change, the PIAS software is frequently updated. Consequently, it is strongly recommended to install on a regular basis the most recent software versions, for which you can refer to PIAS distribution.
- www.sarc.nl
- SARC website. www.sarc.nl
- News
- Newsfeed where important information is given on updates and changes in the software. An exclamation mark indicates there is an unread news bulletin. www.sarc.nl/news
- Contact
- Contact details.
These PIAS modules do neccesarily act strictly separated, the modules can be instructed to share their data in the background, in order to achieve that changes in one module, for example a hull shape modification, is directly processed in other modules, such as the stability calculation. This mechanism is baptized local cloud and is further discussed in Local cloud: simultaneous multi-module operation on the same project.
Finally, the question might be posed whether multiple PIAS modules can be used simultaneously. The answer is:
- Obviously, it is useless to invoke the same module twice. So, the PIAS main menu does not allow so.
- With the local cloud mechanism multiple modules share their data instantaneously, without the involvement of files. For this reason, multiple different modules for the same project can be invoked, which is exactly the reason of existence of the cloud.
- If the cloud is not in use, still multiple modules can be invoked simultaneously (which is unavoidable, because this must be facilitated for projects which do use the cloud mechanism). However, one should realize that in this case all modules read their data from file only once, at start-up, from file. So, later changes from one module will not be processed in other modules. Errors are easily made in this case, so it is discouraged to do so.
- If it is desired to work on two different projects at the same time, the PIAS main menu can simply be started twice. The question whether this is convenient or confusing is left to the user.
- Besides, the different modules can also be started directly from Windows, after all they are simply independent executable programs. Except for very specific applications — e.g. in the context of a larger automated ship design system — this is strongly discouraged.
Working with PIAS' modules
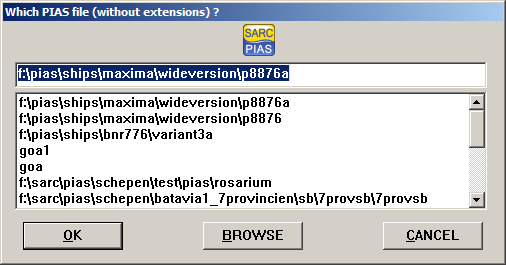
File selection popup window.
When invoking a PIAS module, a ship or project file name must be given. For that purpose, a selection window pops up, as shown in the figure above, offering three options:
- Enter a file name in the topmost row. Here always the most recently used file name shows up as default, so that in general a simple <Enter> will suffice to continue with that file.
- Choose one of the twenty most recently used files, as depicted in the text box in the middle.
- Browse the directories to find your file.
- Note
- It is recommended to create a new subdirectory where PIAS stores all project files. This is not obliged, however, experience has shown this practice to be clear.
The ship or project file name which one is supposed to give is excluding extension and in principle including the name of the path (=folder =subdirectory). If no path is given at all, Windows will choose a path at own choice, which is presented to you for approval (and if you disapprove, by the way, then the module stops and can be re-invoked while including the desired path explicitly). More details on files and their management is given in File conventions.
After choosing the file name the module main menu comes up. Its operation and input facilities are discussed in a separate manual chapter, which is Operation of PIAS. It is recommended to take a quiet read at that chapter.
- Note
- If one wishes to avoid the labour of entering the filename each time a module is invoked, in the main PIAS menu a fixed file name can be specified, as discussed in PIAS Main menu.
The availability of functions
By now it will be clear that PIAS is composed of several modules. Moreover, within such a module multiple functions can be accommodated, such as the longitudinal strength function which is hosted by the Loading module. For details reference is made to the function list. Each PIAS user has selected a tailored package, which implies that only actually relevant functions have been purchased. It might be that in this manual functions will be discussed that are not part of your package, in that case the program reports “This function has not been purchased”, or something similar.
Export of results
Output of PIAS can be exported to file (see Output filetype) or to Windows' clipboard (please refer to Print options for how to configure). The user can choose from a number of standard formats, viz:
- Text
- This is the simplest output, just plain ASCII text, without drawings and without attributes for font types, font sizes, paper sizes etc. This format can be read by every text editor or spreadsheet program. However, many details will be lost.
- Tabbed text
- Almost identical to the Text format, albeit that multiple spaces have been replaced by ‘Tab’ characters. This enables some spreadsheet programs to separate multiple figures on one line into spreadsheet columns.
- Image
- With this format a graphical map of a page is generated. This map contains all font types, character attributes and of course all possible plots. However, the disadvantage of this format is that characters are not recognized by many receiving applications, so, for example, text modification with a text editor will not be possible in many cases. In this area MS Word is a little smarter than some other editors, because it recognizes the characters and enables their manipulation.
- Rich Text Format
- Rich Text Format is a Microsoft standard, which is suitable to transfer documents between text editors, or to generate documents for text editors. RTF is supported by OpenOffice, MS-Word and Windows' Wordpad. With RTF the the output of PIAS can be sent to a word processor integrally, so, including plots and graphs.
Definitions and units
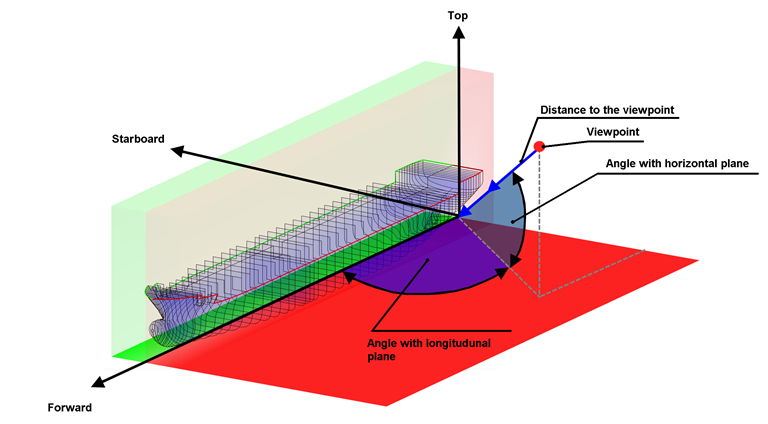
Definition of viewing angles in three-dimensional views.
- Standard units of PIAS are metric.
- Threedimensional views are defined by means of the angles with the horizontal plane (from above is positive for angles < 180°) and with the longitudinal plane (from PS is positive for angles < 180°), as indicated in the sketch above. As a matter of feedback, in the case of the 3D hull view in Hulldef, and the 3D compartment views in Layout (there only during rotating) in the status line at the bottom of the window the numerical values of these angles are printed.
- Unless stated otherwise, all dimensions are in meters, volumes in m3, weights in metric tons and densities (=specific weights) in ton/m3.
- Breadths are measured from center line, positive to starboard, negative to portside.
- Heights are measures from origin, positive upwards. The user is free to choose origin, in general it will coincide with base line, but it doesn't necessarily has to.
- Lengths are measured from a origin, which can freely be chosen by the user. Commonly, the origin will coincide with aft perpendicular, however, it might occasionally be convenient to put origin at the aft extreme of the ship. Anyway, the measurements are positive forward of the origin and negative to the aft.
- Length between perpendiculars can in principle be chosen freely, and is given in the main dimension menu in Hulldef or Fairway (see Main dimensions and allowance for shell and appendages or Define main dimensions and other ship parameters).
- Drafts are measured in center plane, as depicted in the figure below. At large angles this can lead to large positive or negative drafts, however, that is nothing special, it is just a consequence of the applied system of axes, a matter of definition.
- Draft aft is taken at the origin (by definition at a longitudinal position of zero meter). Draft fore is taken at forward perpendiculars.
- Mean draft is at length between perpendiculars / 2.
- Trim is the difference between draft fore and draft aft.
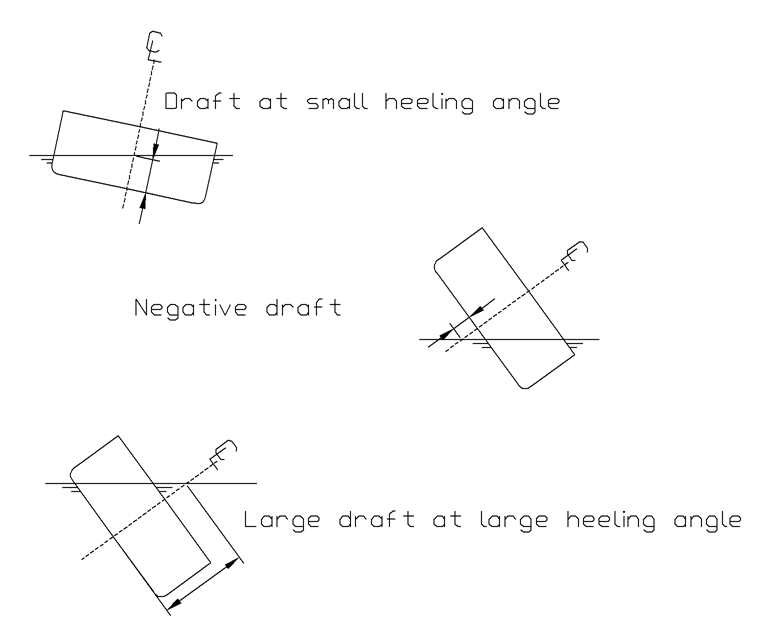
Definition of draft.
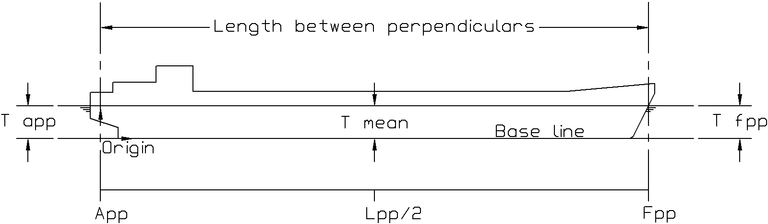
Definition of length and draft.
And finally, the stability lever. KN×sin(φ) is defined as the least distance between the vector of the buoyancy force (which intersects centerline at the false metacentrum N) and keel point K. As depicted in the figure below, where B is the center of buoyancy. Assuming that center of gravity G is located at centerline, the righting lever can be determined with the equation GZ = NG×sin(φ) = KN×sin(φ) - KG×sin(φ).
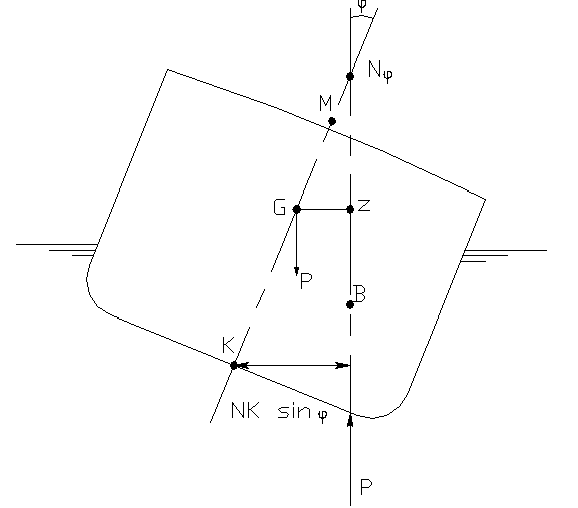
Convention of stability lever and KN.sin(φ).
Help
Each module contains the PIAS [Help] menu. This menu has five sub options:
- Open the help reader (can also be done by pressing function key <F1>), see also Manuals, exercises and information sources).
- Open the entire manual in PDF format.
- Connect to www.sarc.nl.
- Show the creation date (compilation date) of the present module, as well as its version number (revision number). These data can be used to determine whether it is about time to download an update, please also refer to PIAS distribution for that.
- Print the same creation date and revision number to a preview window, from which it can be printed on paper, or copied & pasted into another document, for example to a stability booklet in order to record the particulars of the software used for the calculations. Copy preferably as image, not as RTF because that can be interpreted differently by the various text editors, which might lead to small layout differences. While as image the entire content, including the rounded frame, is exactly transferred. An example is depicted below.
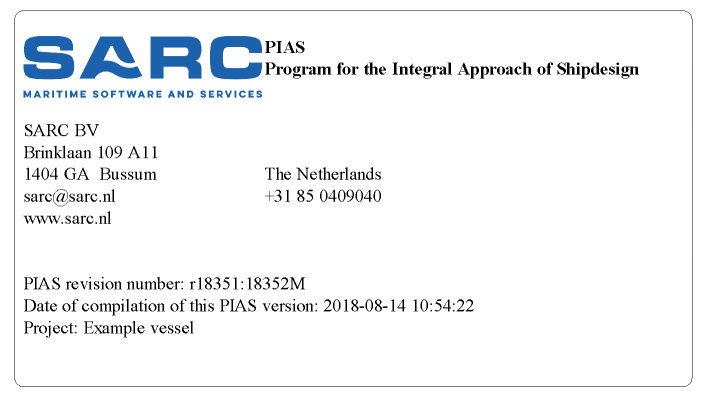
Printout of program version and date.
Setup
Each module also contains the PIAS [Setup] menu. This menu contains the following options (by the way, not the whole lot is relevant to work properly with the software):
Project Setup
Here the setup for the specific ship or project of the contemporary opened file can be given. These options are discussed in detail in Config: General project configurations.
Program setup
By means of menu bar option [Setup]→[Program setup] a number of program configuration choices can be set. This setup is valid for entire PIAS — not just the project at hand — and are stored and used on the computer where it is made. Options are:
Performance Settings
Available threads for PIAS
Many of the computationally intensive tasks of PIAS are distributed across multiple processors (or cores that will be used as a synonym here), please refer to the details thereof at PIAS/ES 1: dualthreading and PIAS ES 2: octothreading. That's fine, because that reduces the calculation time. Unfortunately, MS-Windows treats the load distribution over the various processors somewhat clumsy, with the result that if all processors work hard on PIAS, occasionally, other tasks hardly can come between. That makes the computer to react a bit sluggish. The statement that this does not necessarily has to be so — and that such thread scheduling in Unix in 1985 was better arranged then under MS-Windows today — does not bring us forward. So, a practical solution was implemented where a user can set the number of processors to be simultaneously assigned to PIAS. That number can be specified here.
Run benchmark
The CPU benchmark performs a series of computationally intensive tests to measure the performance of your processor when using multiple threads. The result is a report containing both a table and a graph, showing the scalability, efficiency, and throughput of your CPU. This benchmark is executed using the same number of threads available in the PIAS modules, ensuring that the results are representative of real PIAS workloads.
1. ACCESS TO THE BENCHMARK FUNCTION
The benchmark is available in all PIAS modules via:
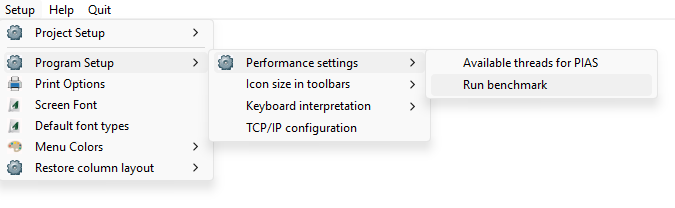
Setup menu and submenus.
[Setup]→[Program Setup]→[Performance settings]→[Run benchmark].
In the same submenu you will also find: Available threads for PIAS
Here you can see how many threads your PIAS license allows and – if desired – manually set a lower limit. The benchmark will, by default, use the maximum allowed number of threads, unless you choose a different value manually.
2. PURPOSE OF THE BENCHMARK
The benchmark measures how quickly your processor executes heavy calculations as the number of concurrent threads increases. This provides insight into:
- The absolute computational performance of your CPU;
- The scalability when more threads are used (weak-scaling);
- The efficiency per additional thread;
- The effect of P-cores and E-cores (if present);
- The influence of PIAS license limitations on maximum thread count.
3. STARTING THE BENCHMARK
When you start the benchmark, a selection window appears:
- Use all available threads
The test runs with the maximum number of threads allowed by PIAS.
- Specific number of threads
- You may also specify your own number (minimum 2).
During the test, all logical processors are used intensively.
During this period, your computer may respond more slowly.
4. HOW THE BENCHMARK WORKS
The benchmark consists of two phases:
- A. “Learning” phase
A short preparatory phase in which the operating system and CPU scheduler learn the nature of the workload. This stabilizes the distribution over P-cores and E-cores and reduces measurement noise.
- B. “Measuring” phase
- The actual benchmark. For each thread configuration (1 to N):
Each thread performs the full computational workload (weak-scaling); the total runtime is measured for that thread count. From this, the following values are calculated:
- Time [s] – total elapsed time;
- % of 1-thread – relative computation time compared to one thread;
- Speedup – throughput speedup;
- Efficiency [%] – weak-scaling efficiency.
5. RESULTS AND REPORT
After completion, a report is generated automatically. It contains:
- A. PIAS Information
Version, revision number, and compilation date.
- B. System Information
Computer system/model
CPU type
Hostname
CPU topology:
- Physical cores
- Performance cores
- Efficiency cores
- Logical cores (threads)
- C. Thread Limits
Number of threads permitted by the PIAS license.
Maximum threads set by the user.
Any temporary limits applied during the benchmark.
- D. Results Table
A table containing:
- Time per thread configuration
- Percentage [%] of 1-thread
- Speedup
- Efficiency
- E. Graph
- A graphical representation of:
- Point cloud of measurements
- Scalability per thread count
- Min/Max values per thread
- License limit (green dashed line)
- User limit (orange dashed line)
6. AXIS DESCRIPTIONS OF THE GRAPH
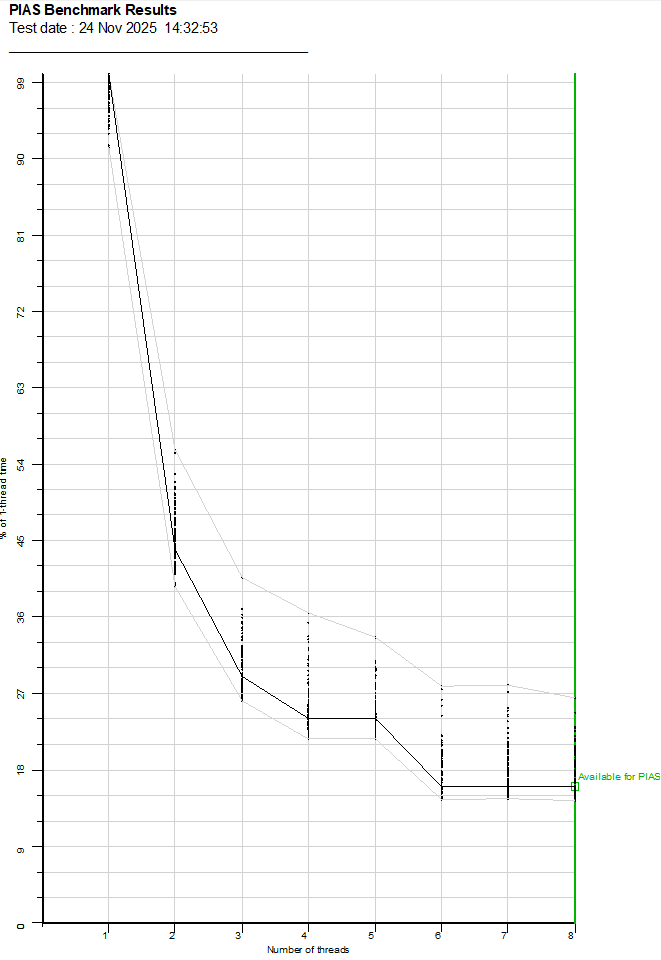
The output graph.
The benchmark graph contains two axes:
- 1. X-axis – Number of threads
Shows how many threads were used during the test.
Range: 1 up to the maximum set by the license or by the user.
Each thread = one logical processor
CPUs with P-cores and E-cores use both types
Vertical markers: Available for PIAS (green), User limit (orange)
- 2. Y-axis – % of 1-thread time
- Shows how much of the computation time per thread remains compared to the 1-thread case.
100% = as fast as 1 thread
50% at 2 threads = perfect scalability
Values vary per CPU depending on cache, memory bandwidth, and thread scheduling.
7. RECOMMENDATIONS FOR ACCURATE RESULTS
- Close heavy applications and background processes.
- Avoid Windows updates and antivirus activity during the test.
- Preferably use mains power.
- A system run after a reboot often gives the most consistent results.
8. INTERPRETING THE RESULTS
Lower time [s] = faster CPU.
Percentage [%] of 1-thread should ideally decrease according to 1/N.
Speedup increases almost linearly with good scaling.
Efficiency of 80–100% at lower thread counts is excellent.
A plateau or increase may indicate:
- Limited memory bandwidth, or
- P-core / E-core shifting, or
- License or user-imposed thread limits.
9. POSSIBLE LIMITATIONS
- CPUs without AVX do not support the benchmark.
- Thermal throttling may affect results.
- Background activity (updates, antivirus) may introduce variation in the measurements.
Icon size in toolbars
With this selector the toolbar button format is specified. This is only applicable to icons from the Windows-managed toolbar, as located directly under the function button bar, at the top of each window. All other icons or buttons are not affected by this selector.
Communication parameters interoperability
These settings are experimental for the time being, and therefore not for general use.
Print options
Opens a popup which contains several options to modify the way output is handled within PIAS.

Print options.
- Output to
- Where to the output is directed:
- Preview/clipboard, Which offers a preview on the output and a facility to copy the output to clipboard. When using the clipboard, its menu bar contains several functions:
- Prev and Next, The operation of these buttons speaks for themselves. Navigating through the pages can also be achieved via the keyboard with the <PgUp> (or left arrow) and <PgDn> (or right arrow) key respectively. Using the above mentioned keys in combination with the <Ctrl> key one can be quickly navigated to the first or last page.
- Go to page, This allows for quick navigation to a specific page. Can also be invoked by pressing the <G> key on the keyboard.
- Copypage, Copies the current page to clipboard. In other Windows applications, such as word processors or spreadsheets, this page can be imported with the [Paste] option. The page can be copied to clipboard in several formats, please refer to Export of results for a discussion.
- CopyAll, Copies all pages of the output to clipboard.
- Print&Quit, Print yet all output, and close the preview window.
- Quit, Close the preview window.
- Printer, One of the installed printers as configured by Windows Devices and printers option (or whatever its name will be in your Windows version).
- File, Sends the output to the specified file, which can be defined at Output filetype.
- Output as
- For the Output to types Preview/clipboard and Printer the output can be printed in the following styles:
- Page, Where a page length of approximately A4-size is assumed, which makes a longer output to be subdivided over the sheets of paper. This is the default style within PIAS.
- Roll, Which does not subdivide the output because of the paper size into pages. With this option it is assumed that the printer has an endless roll of paper (where, by the way, the application can still decide to start on a new page, but that is because a new subject asks for it, not because of the paper format). This style is intended for exceptional situations — for example if the output should become available to other software without intermediate headers, or if one wishes to create a personal page distribution.
- Choose printer
- Select the printer to be used when the Ouput to has been set to Printer.
- Output settings
- Some general output settings:
- Page setup, Choose this option to open the page setup menu of the printer as selected under Choose printer.
- Font, Modify the printer font size.
- Black/White, Activate this option to print output in black and white.
- Output miscellaneous
- A few miscellaneous settings:
- Page height (% default), Output to printer can be formatted quite neatly, because PIAS can communicate with the printer about the measurement details, such as font size and paper size. However, output to preview/clipboard and to RTF is often pasted into a word processor, from which these details are not available to PIAS. For that reason, PIAS uses a standard page height for ‘standard’ preview/clipboard cases. With this option this height can be tuned, with a value that is a percentage of PIAS' standard. So, when using 100 the PIAS standard is applied.
- Preview width (% window), With this option the width of the preview window can be set, relative to the active window.
Screen Fonts
Adjust the fonts on screen to your preferences. With this option the font type and font size of the primary windows, which are managed by PIAS, are set. However, with this option the font properties in a popup box are not affected, because those are being managed by Windows. That particular font size may occasionally be somewhat small, see the example just below, but can be configured in Windows. With Win 7 use Control panel, Personalization and finally Windows color and Appearance to do so. With other WIndows versions this setting might be in a different location or have a different name.
Popup box, for which the font properties can be set in Windows.
Default Fonts
Restore the fonts for printer and screen to their default settings.
Menu colors
Here, the colors can be set as they are used in the selection windows and input windows, such as discussed in Selection window and Input window. De sub options here are:
- Make standard color scheme
- This sets all colors to their default setting.
- Lines between cells
- Set the color of the lines between the cells of the selection windows and input windows.
- Cell options indication
- In Content and options in the cells of selection windows and input windows it is explained which symbols are used to indicate the cell options. Their color can be set here.
- Lines around the text cursor row
- The selected cell of the moment is indicated by a color, this is the text cursor. Because rows may be long, users have expressed the desire to indicate the entire line of the text cursor. This is done by means of pronounced line around it. Its color can be set out here.
- General background color
- Of the empty window.
- Foreground and background font colors
- For a number of text categories (which are supposed to speak for themselves), foreground and background colors can be chosen here.
Restore column layout
The widths of columns and cells in input windows have default values which are tuned to the anticipated largest size of the cell contents. If desired, a user can adjust the widths, and the column order as well, as is discussed in Input window. With this function, [Restore column layout], those manually configured column properties are being restored to their defaults, either for all menus of PIAS, or just for the present menu.
Data storage and backups
A premise of PIAS is that a user enters data with the aim to keep them, which therefore implies that when leaving a module all input data is stored on disk, which requires no separate action. Also, while being used modules will save their data on a regular basis, the advantage is that in case of unexpected failures fairly recent data is still available. In addition, some modules provide an exact data storing time interval. If the data should not be stored, the module can be quitted by the File and backup management / Quit module without saving the data option, as discussed below ( Quit module without saving the data). Additionally, (most of) the PIAS modules have a backup system which works with their specific files, but has a generic way of operation. A typical menu for this functionality is:
Save data on disc
As discussed, the PIAS modules save their data on a regular basis, and do that for certain on exit. But one can at some stage also have the need to make sure that everything is stored in between, which can be achieved with the present option.
Create backup
With this option a backup copy can be made from all data as managed by the particular PIAS module. With this backup the time and calendar date are also saved. Additionally, a window appears, where a description of the backup can be given, which will be saved together with the backup.
Restore data from backup
Here a list comes up which shows all backups that are available on the ship directory (which is the folder which contains the files of the current project). This can be used for three actions:
- In the third column the first line of the backup description is presented. With an <Enter> on that field the whole description appears, which can be modified if desired.
- With [Remove] the highlighted backup is permanently erased.
- With [restOre] the data of the highlighted text cursor are being restored. It speaks for itself that all current data of the current project are brutally overwritten. Because that is not always the users' intent, two precautionary provisions have been made:
- When using this [restOre] first all available backups are compared with the present data. If this shows that a backup exists which is a copy of the present data, then there is no risk of losing data, because this copy can always be restored. However, if this is not the case it might be wise to make a quick backup from the present data, so, if program detects this situation it shows a popup box offering this option. By the way, please see that this comparison is very accurate, a copy should be perfect to be recognized as such. That means that for example a minor setup modification (if stored) will result in the backup not being seen as a copy.
- In the ‘Duplicate’ column the user can see for each backup whether or not it is such a copy. For clarity: this means that the backup is identical to the present data, however, it still remains a standalone copy without any further link to the module data.
Furthermore, in this window also a greyish backup might be visible. That is an automatic backup as produced by the module at start-up, which only use is in combination with option Quit module without saving the data. This backup cannot be utilized for other purposes.
Import data from another project
The previous option is intended to restore data from the current project, with this option data from another project can be imported. After selecting this option, a file browser appears which must be used to select the desired backup. It can be that this backup contains multiple data categories (e.g. ‘frames’, ‘openings’ or ‘wind contour’), in which case the user is asked which category or categories to import. By the way, with this import action all current data (of the appropriate category) are replaced, so they are not added or something alike.
Quit module without saving the data
This option works as it suggests; the current PIAS module is closed, and the involved files are restored to the state at the start of the module. All intermediate changes and actions are being discarded with this option, that does not only apply to ‘typed in’ changes, but also for restoring or importing backups, and for automatic data saves. However, an exception is made for deliberate manual save actions (e.g. with Save data on disc), which constitutes a new starting point, and makes it so that with the present [quit without save] action the files are restored to the content of the moment of this deliberate manual save.
File conventions
Files and extensions
PIAS distributes shipdata or projectdata over many files, where each contains a separate type of information. In the vast majority of these files the information is stored binary, so they are not readable by a human. The files start with the project file name and end with an extension chosen by PIAS, which indicates the type of information. Occasionally, users have asked for a list of file extensions, and although such an overview existed, in 2013 it was withdrawn for two reasons. In the first place many of these files are mutually associated, so data consistency might be jeopardized if files are replaced at random. And, secondly, it is no longer necessary to exchange individual files because with the backup facility — which has been discussed just above — all information which is managed by a particular module is combined into a single file which can be imported elsewhere. By the way, if all data of a project must be transferred or backed up then nothing is easier than zipping — compressing — into a single file. Furthermore, files are in principle compatible between all PIAS versions, although there are three exceptions:
- New PIAS versions often have more capabilities, which sometimes require an enhancement of the file format. So, the files have to be converted than, which remains unnoticed by the user because it happens automatically. So PIAS versions are upwards compatible. However, if files are subsequently transferred and used in an elder version then this will obviously not recognize the new format. The remedy is rather simple by replacing the elder version with an update.
- Although files of the LOCOPIAS loading software originate from PIAS, they are encrypted and consequently no longer usable in PIAS. This is deliberate, in order to ensure the file integrity of LOCOPIAS.
- PIAS versions supplied to educational institutes could also (deliberately) be made incompatible with other PIAS versions. The reason is to discourage the use of an educational license for commercial work.
In the last two cases it is yet possible to convert the files, so they can still be reused. You can contact SARC for this purpose.
Hull form representations
In PIAS, different hull shape representations are used for different purposes. These describe, obviously, the same geometry, but in a different way. The table below presents an overview.
| Representation | Contains | Purpose | File extension |
| Frame model | Cross sections (frames). | All volumetric and hydrostatic computations, (damage) stability, tank sounding tables, longitudinal strength, etc. | Until 2019 .hyd, then .frames |
| Curved surface model, alternatively solid model | The closed, curved hull surface. | For Fairway. | .fr* |
| Triangulated surface model | The closed hull surface, represented by many small flat triangles. Generated by Fairway. | For plots to the closed hull shape in PIAS, exceptionally for a (e.g. tank sounding) computation. | .tri |
| Wireframe model | 3D curves from the ship hull surface. | Importing 3D geometry (e.g. as exported by other CAD software) in Fairway, please refer to Import ship hull models in SXF/CXF format for that. | .sxf and .cxf |
- At first sight it may seem confusing that the second representation has two names. This is because it can be seen from two points of view: for a user, the image is what counts, and that is the curved hull surface. Internally, in Fairway, however, it is embedded in the structure of a intrinsically closed model which offers possibilities for unambiguously finding intersections etc. Depending on the focus of the program or manual in which we are, one or the other term is used.
- In Config it can be set whether PIAS computates on basis of the frame model, or with the triangulated surface model, please see Preferential format of hull files.
- In Hulldef's hullform definition method details and consequences of the frame model are discussed.
- Although it is not customary to name file extensions from the various PIAS data files, they are still included in the table, because some will have grown accustomed to these extensions. However, please realize that these files cannot be used separated from PIAS.
Local cloud: simultaneous multi-module operation on the same project
Ship data are saved on file, however, an additional communication system has been developed, which is baptized local cloud. This facilitates inter-communication between PIAS modules, without using disc files, and without the user involvement. The advantage is that the effect of modified input on a calculation result can directly be made visible. Three examples:
- When a user has the screens of the new PIAS modules form input and loading conditions open, with the last one showing the bar chart of the stability index, then a modification of, for example, the height of an opening in module form input is directly translated to another stability index in the loading conditions module. That may change, for example, from red into green.
- If the modules Fairway and Layout are simultaneously open, then it can be seen that a hull form modification in Fairway is directly processed in Layout. We have made a short video clip of this example, in which you can see how a hull form modification in Fairway is converted in a modification of the form of the tank top in Layout.
- When designing a hull form with Fairway, with the so-called ‘local cloud monitor’ of Hydrotables for instance volume, LCB and maximum allowable VCG' can be shown on the fly. An example is presented in Activate the Local cloud monitors.
Frequently asked questions
In this manual it has been pursuit to elucidate per module its background and modus operandi. However, an occasional question of general nature appears to arise, which will be discussed in this section.
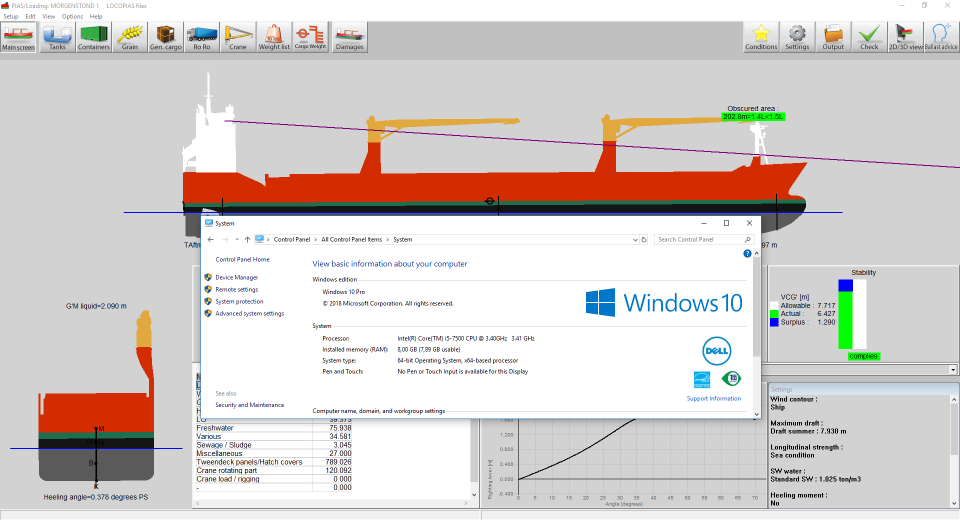
- 1. Does PIAS also work on 64-bits Windows?
Yes. Please see the screen dump at System requirements.
- 2. Is a student version of PIAS available?
Yes and no. An educational institute can for educational purposes, under certain prerequisites, acquire a campus license under favourable conditions. Unfortunately, due to administrative and technical constraints individual student licenses of PIAS cannot be distributed.
- 3. Is PIAS also available for Apple Mac?
PIAS is not available natively for the Mac. A Mac can be configured to emulate or run Microsoft Windows (possibly in a virtual machine), which might offer the ability to run PIAS (although PIAS will then not even be aware of the Mac basis).
- 4. During computations the processor is not working at 100% performance
In the first place there is the possibility that other tasks or processes prevent the processor from working at full throttle. More frequent, this question is posed when working on a multi-processor (or multi-core) machine, while assuming that the computation task will automatically be distributed over the multiple processors. Unfortunately that is not the case; parallelisation — which is the name of this game — must be implemented for each and every task separately and explicitly. For PIAS various multi-threading facilities are available, as discussed in Speed enhancing mechanisms in PIAS: PIAS/ES.
- 5. When re-computing probabilistic damage stability, occasionally slightly different damage boundaries are found then the first time.
That can happen, please refer to Computing the damage boundaries.
- 6. In the PIAS output of the probabilistic damage stability, the grouping of probabilities per damage case (p, r, v and s) differs slightly from the regulations.
Correct observation, the grouping in PIAS is better arranged, as discussed in Execute and print the calculation. Anyway, this is a formatting issue, the results are not affected.
- 7. With the (sub-)compartment method from the probabilistic damage stability, for many damage cases the boundaries are found rather quick, while an occasional other case requires quite some time.
The reason is that for the determination of the damage boundaries, Probdam applies in first instance classical search algorithms, which operate fast. If, occasionally, damage boundaries are not found with these algorithms then an alternative method is used — a so-called genetic algorithm — which has the advantage that it often succeeds in difficult search tasks, however against the price of a significant computation time. Please also refer to Computing the damage boundaries.
- 8. During lengthy calculations the program appears to ‘hang’, with occasionally the Windows message that the program is not responsive anymore.
This message is incorrect. Windows is aimed at communication and user interaction, however, during a long computation there is no interaction between an application program and the operating system. Windows then draws the erroneous conclusion that the program is not responsive, however, in the ‘task manager’ it can easily be seen that the processor is quite busy computing (which is just what computers have been made for).
- 9. I am not able to relocate an existing physical plane — in Layout, to define internal geometry — to every location.
That may very well be, the relocation possibilities of physical planes are limited in order to maintain the ‘logic’ of the compartment layout. Please refer to Limited positioning of a physical plane for details.
- 10. In 3D wireframe models of hullform or compartment, PS and SB sides seem to be swapped.
That will be a matter of optical delusion, against which a tool is available, see View.
- 11. Occasionally, text characters are represented improperly, or an open rectangle is drawn instead.
This happens probably with a character that does not belong to the familiar ASCII standard, such as a Greek symbol, or a letter with a diacritical mark. The PIAS output may contain such output — notably with output in French or German — however, that is only represented well if the chosen font indeed contains these characters. And unfortunately not each Windows font contains each and every character. So, if these characters are not represented properly, then you will have to select another Windows font — in PIAS, or in your word processor or spreadsheet if it happens there. Selecting a screen font is discussed in Screen Fonts, and for the printer font reference is made to Print options.
- 12. Stability criteria.
Answers to a number of questions regarding stability criteria are given in Answers to frequently asked questions on stability assessments.
- 13. The trend of waterline properties (such as area or moment of inertia) against draft, in a hydrostatic table, is a bit jerky.
That might occasionally occur with pontoon-like hulls, but in general does no harm. Explanation and remedy are discussed in Number of frames.
- 14. I know that a body plan available in .BMP beatan format can be digitized in PIAS. Can this also be done with other formats?
Please refer to the first paragraph of Defining the section shape by digitizing a BMP file.
- 15. My virus scanner reports a PIAS file to contain a virus. What to do?
Some scanners do indeed wake up on an occasional PIAS file, but as far as SARC is aware this has, to date, always been a false alarm. Obviously, this does not guarantee that such a warning will always be false, but it is primarily the responsibility of your scanner supplier, who manages the algorithms and their data after all. So, if you would like to assist them, feel free to inform them. SARC cannot provide support because there are too many types and brands of scanners around. Two final comments:
- Sometimes a scanner thinks it a good idea to delete some components of PIAS, e.g. a .dll file. It goes without saying that PIAS will then no longer work properly.
- At SARC, all files, including PIAS packages intended for customers, are systematically tested for viruses and malware (with ESET Endpoint Antivirus).
- 16. PIAS refuses to start, with error message “The program can't start because MSVCR120.dll is missing from your computer. Try reinstalling the program to fix this problem.”.
This is an error message from Windows, and indicates that an essential part of the Windows installation is missing or has become corrupted. This is about "Microsoft Visual C++ 2013 Redistributable" and (re)installing of this is neccessary: By following this link the x86(32 bit) and x64(64 bit) versions can be installed.
- 17. A waterline or buttock in my GUI or in a plot on the output sometimes has an incorrect shape.
In general, this is not a cause for concern because these lines are not used for any calculation. Hulldef's hullform definition method contains some more background information of this phenomenon.
- 18. PIAS works well on my computer, however, everything is so sluggish.
If your PIAS is equipped with the Codemeter software protection then this could be caused by the fact that the Codemeter location has not been set. In effect, this causes the system to search the entire network for it. The installation procedure that prevents this is described in Codemeter installation.
- 19. Calculating probabilistic damage stability may take quite some time. What can I do about that?
SARC has spent much time and efforts to optimize Probdam on lead time. Still, there are some tips that users can take to heart:
- Take advantage of the highest possible level of multi-threading, as available in PIAS under the name PIAS/ES, see Speed enhancing mechanisms in PIAS: PIAS/ES.
- Minimize the number of external compartments, see External compartments.
- With PIAS it is very easy to generate large amounts of damage cases. However, they will all have to be calculated, while from ever larger damage cases their contribution to the attained subdivision index (A) is slowly approaching zero. So, restrict yourself when generating damage cases, e.g. by setting the number of compartments per damage case (see Maximum number of damaged (sub-)compartments per damage case) high only when really necessary.
- Use the numerical integration method instead of the compartment method. See Calculation method probability of flooding for a discussion of the various methods available in PIAS for determining the probability of damage.
- Use the zonal method instead of the compartment method. Unfortunately, in terms of turnaround time, you won't gain anything because the time saved by the shorter zonal calculation time will be more than outweighed by the higher number of person-hours required for manual definition of damage boundaries — while, in addition, the zonal method in general yields a lower A than the other methods available in PIAS — but then again, the question was limited to the calculation time as such.
- 20. When invoking a PIAS module, with a file that already contains a ship hull model, I receive warnings about frame spacing ratios, such as in the figure below. What should I do with that?
- Take such warnings to heart, because the way this hullform has been defined might decrease the computation accuracy. Please also refer to Ratio of longitudinal frame distances.
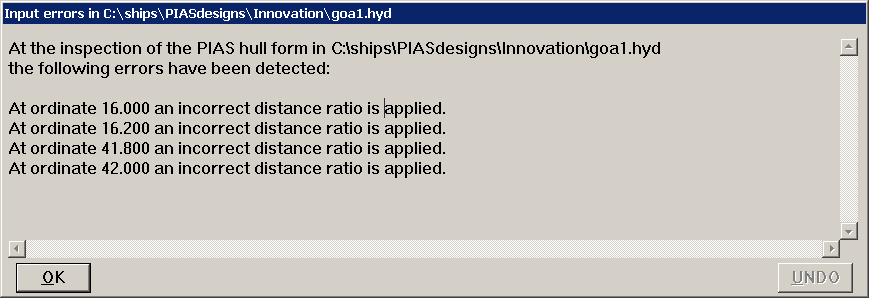
Warning on frame spacing ratio, when invoking a PIAS module.
Finally, it is possible that the program gives an (error) message which is not crystal clear at a glance. In such a case, please proceed as follows:
- Plain, English, messages are assumed to be clear, it might help to visit the manual chapter on the subject which deals with the message. A message with program codes or addresses have no external meaning, even for SARC this is only useful by inspecting the program from within.
- Upon each report that a message is not clear, the program will be modified. So, there is a good chance that with the latest PIAS version of the message disappears, or is put more clearly. Therefore it is advisable in any case to install the latest update, see the next section for that.
- If that does not solve the issue, then you can contact SARC. However, nothing can be undertaken without having the disposal of your data. So please send an email with the text of the program message, the module and all PIAS project files — compressed in a ZIP file or similar — to
support@sarc.nl.
Closing remarks
This chapter ends with some good advices, the terms of usage including copyright notice:
- Because legislation, hardware capacities and opinions about program design are subject to permanent change, the PIAS software is frequently updated. Consequently, it is strongly recommended to install on a regular basis the most recent software versions, for which you can refer to Distribution channel.
- It is recommended to make a backup of your project data on a regular basis.
- PIAS uses the computer system date and time to check on any changes made since the last session. It is therefore of vital importance that date and time of your computer are set correctly, see Computer clock.
- Up-to-date knowledge of naval architectural backgrounds and practices is required for a responsible use of PIAS.
- When PIAS and this manual refer to requirements from e.g. (inter-)national legislation or classification societies, it is not meant to replace the source texts of those criteria.
- The software described in this manual is furnished under a licence agreement. The software may be used or copied only in accordance with the terms of that agreement. The software is protected by the copyright laws which pertain to computer software, it is illegal to make copies of the program or this manual other than for the use or backup by a legitimate user. Copyright (© 1993-2026) of software and manual is held by SARC BV. The last chapter of this manual contains the license terms of PIAS.