In
PIAS Main menu a discussion is included on PIAS' main menu, which is used to switch between the different modules. Those modules make intensive use of selection windows and input windows, for which the operation and control are generally the same everywhere. Functions specific to a particular module will be discussed in the corresponding module-specific chapter, but the general process and options are covered here.
Selection window
After the module is invoked and the project file has been chosen, with the majority of modules a selection window appears. Selection windows are used all over PIAS and present a list of options or functions which can be selected by the user. As shown in the figure below, one of the options is highlighted, this is the ‘text cursor’. The text cursor can be navigated with mouse (select cell by a click of the left mouse button) or the keyboard's cursor keys. An option can be selected with <Enter> or a <Double click left mouse button>.
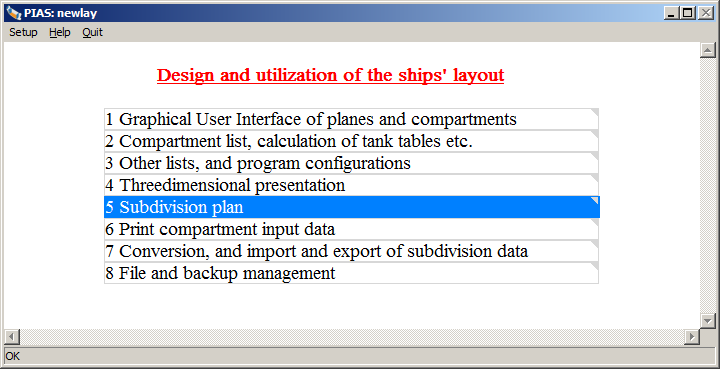
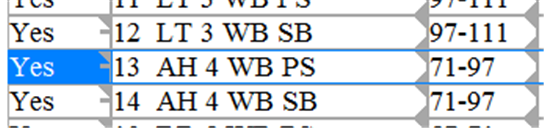
A selection window.
Input window
An input window is somewhat similar to a selection window, however, in general it will contain more cells. The prime difference between the two is that an input window also facilitates the input of data or options. An example is depicted below.
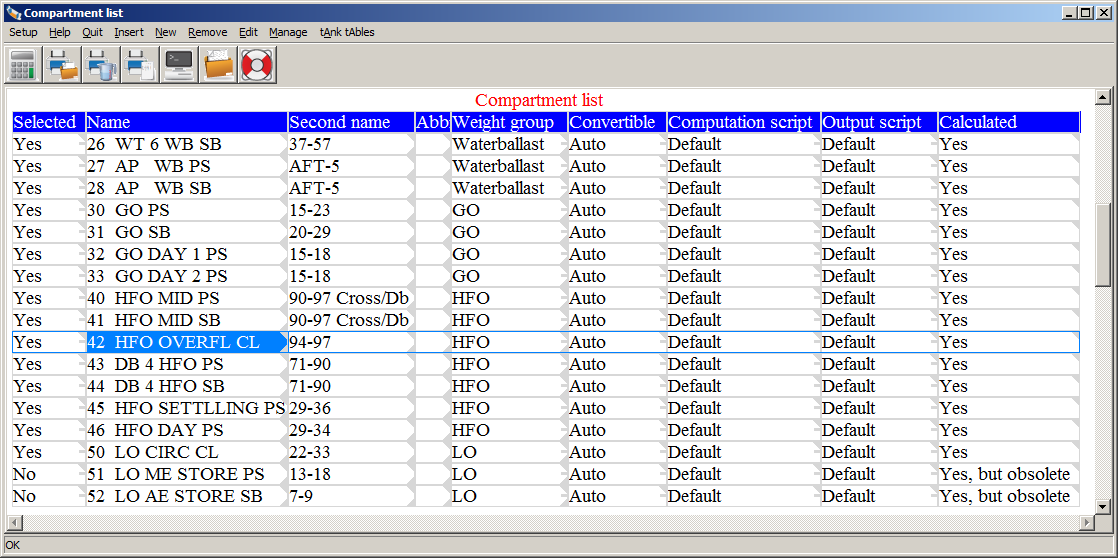
An input window.
The selection windows and input windows offer the following navigation options:
- Keyboard navigation
- PIAS has been designed to work swiftly with mouse as well as keyboard. For the latter, the following keys can be used:
- The arrow keys for moving the text cursor. In combination with <Ctrl> the cursor keeps its position, and it will be the whole text block that moves (so the block will scroll).
- <Page Up> and <Page Down> to move the text cursor one page.
- <Home> and <End> to jump to the first or last row. In combination with <Ctrl> to the first or last row of the entire text block.
- <Enter>
- Just as in a selection window, to select a cell, in other words to go to the window or menu one level deeper into an option or cell where the text cursor is situated.
- <Esc>
- Also just as in a selection window, to return to the previous window, in other words to go one level back. <Esc> performs the same function as [Quit]. When <Esc> is pressed in the main menu of a module, PIAS returns to PIAS' main menu.
- Mouse
By default, the mouse buttons have the following functions in PIAS:
- The <left mouse button> for selecting the cell below the mouse pointer.
- <Double click left mouse button> is equivalent to <Enter>.
- The <middle button> to choose from predefined values, as discussed in Content and options in the cells of selection windows and input windows.
- The <right mouse button> is equivalent to <Esc>.
- The mouse wheel to steer the text cursor up or down.
Mouse buttons may be assigned a different function in Windows, which will make the mouse to behave unexpectedly. This can be solved by reconfiguring Windows. Specific PIAS modules may assign specific functions to mouse buttons, notably within the context of a GUI. If so, this will be discussed in the chapter on that module.
- Keyboard input
- Names and numbers etc. can simple be typed into a cell, as is custom in e.g. spreadsheets. The specific input and selection facilities will be discussed in Content and options in the cells of selection windows and input windows.
Furthermore, the menu bar may display the following functions:
- Help
- See Help.
- Setup
- See Setup.
- Quit
- Return to the previous menu, identical to <Esc> just above..
- Insert
- Add a line above the current line.
- New
- Add a line below the current line.
- Remove
- Removes the current line or all selected lines of a selection.
- Edit
- Contains a number of editing tools - such as copy, paste and undo - which are discussed at Copy, paste etc..
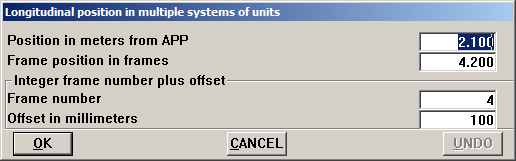
Longitudinal position in multiple systems of units, activated by F4.
And, finally, the following options facilitate in the use of input window further:
- <F1>
- Opens the context-sensitive help reader, of which Manuals, exercises and information sources contains an example.
- Function key F2
- In order to edit the text in a cell, the <F2> can be used. The existing text will then become modifiable, with the following operations:
- <Left mouse button> to move the edit cursor. This can also be done with <End>, <Home>, <arrows left and right>, as usual.
- <Backspace> and <Delete> to remove a character.
- <Crtl><C>, <Crtl><V> and <Crtl><X> for the usual copy and paste with Windows’ clipboard.
- <Crtl><arrow left> and <Crtl><arrow right> to jump a word to the left or to the right.
- <Enter> or <Double click left mouse button> to stop editing.
- Common characters are inserted at the cursor location.
- <F3>, see just below.
- Function key F3
- To edit a longitudinal position, <F3> enables the conversion from frames to meters. After <F3> the program will display ‘Fr.?’, inviting you to enter a frame position, which will directly be converted to meters. A non-integer frame position can be entered in two ways; the first is simply with the decimal point, for instance frame 3 3/4 can be given as <3.75>, and the second contains an offset in millimeters, e.g. 150 mm before frame 14 can be typed as <14+150>. This conversion mechanism is only available when frame spacings have actually been defined in in the menu of the ship's general particulars, see Frame spacings for a discussion.
- Function key F4
- <F4> is an extended version of <F3>. It offers the same frame position conversion options, however, now shown in a popup window, which shows also the frame position and offset, see the picture above for an example. Please be informed that the meter values are leading, and that those are converted each time to frame positions. Frame positions as such are never stored.
- Function key F5
- For certain positions/dimensions, it may be convenient to define them referentially. <F5> opens the necessary pop-up window to make them referential, if applicable. To use this functionality outside of Layout, reference planes must be defined, see Menu with properties of planes.
- Set column width and column order of an input window
An input window usually contains a header with titles at the top of each column. At the edges of those headers vertical separation lines are drawn, and when hovering the mouse pointer above such a line a horizontal arrow appears. By pressing the left mouse button, the column width can be adjusted, as depicted in the figure below. If a header is not present, individual cells can be adjusted in the same way.
In a similar way, the column order can be customized: direct the mouse pointer to a header text, press the left mouse button, and then go to the separation between two other headers. Upon releasing the mouse button the designated column is relocated to this place. See figure below for an example. This feature has not been implemented in each and every menu of PIAS; only where useful — in case of wide input windows — it is included. If this feature is present, the indication thereof is, the light blue lines on the edges of the column headers.
Both settings, column widths and order, can be brought back to their defaults with [Setup]→[Restore column layout], see Restore column layout, either for all menus of PIAS, or for just the menu visible at that moment.
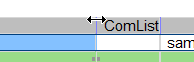
Adjust column width with horizontal arrow.

Rearrange column order.
Besides these standard options, most modules contain specific functions, which are discussed in the chapters of those modules.
Content and options in the cells of selection windows and input windows
With respect to the cells of an input window, distinction can be made in three methods of interaction;
- Select. I.e. go to the underlying window or menu, with <Enter> or <double click left mouse
button>.
- Enter a content. This can be further subdivided in the following two options, viz:
- Enter a free value or name, such as the vertical center of gravity for a weight item, or the name of a compartment. That value or this name can simply be typed on the keyboard.
- Choose from a limited number of predefined values, such as the side of a compartment which can either be ‘SB’ or ‘PS’ or ‘double (=SB and PS)’. With such a choice a popup window comes up where the selection can can be made. An exception is if there is only a binary choice — a choice between two (such as yes/no or selected/deselected). In this case it is pointless to present that choice in a popup window because it is evident that one whishes to choose the single alternative. In order to increase the speed of working with PIAS, the value will therefore be immediately switched to the other value without showing such a popup window. So, although a choice of two is presented differently than a choice of multiple options, they are essentially the same, and therefore also the same in terms of operating. Making a choice of predefined types is simply also a way of data input, just like the entry of a name or a number, and is therefore also invoked by a convenient key on the keyboard, which can be any letter or number. Many persons use for this purpose an easily accessible key such as <Spacebar>, <+> or <-> on the numeric keypad, however, if one prefers a key that leave no trace — which can be nice if you accidentally press the key in cells which do accept textual input — then <F5> can be used for this purpose. Working with the mouse, the choice of such a predefined type is initiated by the <middle mouse button>. A third way to invoke the selection of predefined types is described in the bold text just below.
- Attention
- Please note that <F5> also has another purpose, see Input window.
In order to indicate which of these three actions apply in a particular cell, symbols are located on the side of the cell with the most free space, that is to say, on the left if the text in the cell is right aligned, and on the right if the text is placed left. There may be, moreover, also combinations possible of the three actions, such as that at a loading condition its name can be changed by typing and, by pressing <Enter>, that this loading condition can be accessed in order to enter tank fillings and weights. These symbols are as follows:
- Select with <Enter>: a small triangle at the top of the cell.
- To choose from predefined values: a rectangle in the middle of the cell. For completeness, this rectangle is not only a passive indication that this cell contains predefined types, but also an active switch which will pop up the selection window when doubly clicked with the left mouse button.
- Typing text: a small triangle at the bottom of the cell.
Symbolic indications at the edges of the cells.
Copy, paste etc.
Quite some numerical input in PIAS is done in an input window, which justifies to extend this facility with some supporting functions. The availability of these functions is determined for each module individually, so some variations may occur, however, the majority of input windows is equipped with the [Edit] function, which contains the following sub-functions:
- Undo (or ctrl-Z)
- Undoes the last modification.
- Redo (or ctrl-Y)
- Redoes the last modification.
- Copy cell (of ctrl-C)
- Copies the content of a cell to Windows' clipboard. Except the content of a single cell, also the content of a selection of multiple cells can be copied. For this purpose first such a selection should be made by holding the <Shift> or <Ctrl> key while extending the selected area by moving the text cursor with the cursor keys or the mouse via clicking or dragging. The <Ctrl> key can be used to make multiple selections that are not adjacent to one another. Alternatively, all cells of the input screen can be selected with the [Select all] function. With the text cursor in the selected area, the entire selection will be copied, otherwise only the single cell on which the text cursor resides will be copied. If several selections have been made, it may not be possible to copy them to the clipboard, in which case a message will be displayed.
- Paste cell (or ctrl-V)
- With this function the clipboard content will be pasted into this input window. This function has two variants, the first one is actually the exception, which occurs if the clipboard contains only the content of a single cell which is pasted into a selection of multiple cells. In this case the clipboard content will be copied into every cell of the selection. In all other cases the clipboard content, irrespective whether it contains one or more cells, is copied starting on the location of the text cursor.
- Copy row
- Which makes the entire row where the text cursor is located to be copied into internal PIAS format (so, not to clipboard). The difference with the previous [Copy] is that under the visible row much more information can be available, which is also copied in this fashion. Examples are frames (which includes points of the frames ‘below’ the frame itself) and loading conditions (which contain weight items ‘below’), which can be copied integrally in the input window with this function.
- Paste row
- If a row has been copied with the previous option, with this [Paste] function a copy will be made into the line of the text cursor. In the case of pasting to a selection, all the rows of the selection are overwritten.
- Info
- In a particular input window paste or undo may not be supported for each column. In this case, with this function one can enquire for which columns this applies.
- Select all (or ctrl-A)
- Which selects all cells of the input window.
- Select column(s) (or ctrl-S)
- Selects one or more columns, i.e. the column the text cursor is on or all columns of the selection.
- Select row(s) (or ctrl-D)
- Selects one or more rows, i.e. the row the text cursor is on or all rows of the selection.
- Cell functions
- The function keys <F2> to <F5>, which are discussed in Input window, but now as menu options. It should be noted that the availability of these options may vary from cell to cell.
On these supporting functions a few remarks still can be made:
- A selection is almost always cleared after performing an action/command or moving the text cursor without holding down the <Shift> or <Ctrl> key.
- Selected areas consisting of multiple cells can be used for copy and paste, as discussed above, and for concurrent input as well. For certain actions, selected areas have significance, e.g. when deleting multiple rows, in which case this will be described in the manual for the relevant action.
- Undo and redo information remains available per session of an input window. So it is not stored permanently.
- The exchange format between a selection and the clipboard is according to Excel convention, which means that columns are separated by a Tab, and rows are terminated by a CR (Carriage Return) LF (Line Feed) combination.
- The GUI of Fairway has its own integrated undo/redo facilities, which have nothing to do with those in the input windows.
Error messages and well-intentioned warnings
A program can, for several reasons, generate error messages aswell as well-intentioned warnings. This, for example, can happen due to user input being outside of accepted values or because a calculation cannot find a solution. This menu facilitates in the proper handling of these messages and warnings.
The menu displays a description of the error message or well-intentioned warning. The colour depicts if it is an error message or a well-intentioned warning — these colours can be set to your personal liking —. The description cannot always display all the information available, if so then the description column can be entered to show all the information, this can also be discerned from the ‘Extra info’ column when it is set to ‘Yes’. The information presented, when entering the description column, can be a more in-depth explanation of the description or contain references to items that are at fault. The column ‘No. of times given’ gives a quick overview of the number of times that error message or well-intentioned warning has been given.
There are also several menubar option which are explained below:
- The option [Settings] gives the possibility to turn off well-intentioned warnings and gives control over the colours used for Error messages and Well-intentioned warnings.
- If the option [Link to manual] is available then the PIAS manual will be opened to a relevant section with information for resolving or elaborating on the error message or well-intentioned warning.
- The option [Open log] opens a written text file containing all the error messages and well-intentioned warnings. This can come in handy when there are several items that need to be resolved. The text file is always generated when this menu pops-up, so there might be a need to save the text file to a new location in order keep the error messages and well-intentioned warnings.