|
LOCOPIAS Manual Seagoing Vessels
2026
Loading Computer Software
|
|
LOCOPIAS Manual Seagoing Vessels
2026
Loading Computer Software
|
There are two ways to use this Cargo weight module. One can verify a loading condition with observed drafts / freeboards. Or one can compare a loading condition before and after (un)loading to calculate the (un)loaded cargo weight, perhaps better known as a draft survey. Detailed instructions for both methods can be found later on.
In general the following steps have to be done for both methods. For the compare condition method steps 1 and 2 are repeated for the initial and final loading condition.
The governing idea of this method is that the displacement of one loading condition can be verified by comparing it with the displacement resulting from observed drafts / freeboards. This can for example be used to check the actual cargo loaded weight against the planned loaded cargo weight as entered in the loading condition in LOCOPIAS. Or one could determine a dead weight constant, if the actual displacement always differs from the displacement according to LOCOPIAS.
Below you find the steps that should be taken to determine the difference between the displacement based on the observed drafts and the weight list of the loading condition.
The first step is to define the loading condition. Perhaps this step is already finished. Otherwise go back to the [Main screen] and define the loading condition by using the other modules, see: Modules . Enter all details like tank fillings, grain bulkheads, cargo etc., like you would normally do. When finished enter the [Cargo Weight] module again.
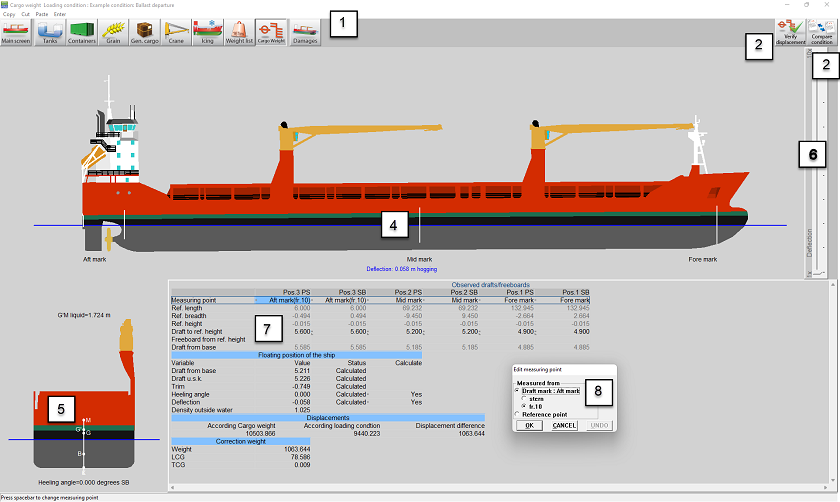
Now you should enter the observed drafts (default) or freeboards. In 7 you will enter the drafts on the pre-defined draft marks. Alternatively, you can also define a reference point yourself and indicate whether you want to enter drafts or freeboards. Press <Spacebar> or any other keyboard key, in accordance with the LOCOPIAS operation standard as described in Content and options in the cells of selection windows and input windows at the measuring point in the [observed drafts / freeboards] window 7 to open the [edit measuring point] window 8.
After entering the drafts / freeboards you can check in windows 4 and 5 if the vessels position is as expected. Also the expected hogging / sagging can be checked. If the hogging / sagging is not very clear, the deflection can be exaggerated by using 6.
Press the ‘verify displacement button’ 2 to make the calculation. A popup will be displayed showing the displacement according the observed drafts / freeboards, and the displacement as entered in LOCOPIAS and the weight difference between these two. If the user wants to add the weight difference as a correction weight to the loading condition, they should tick the tickbox at the bottom of the popup window. The user should give their best estimation of the vertical center of gravity of this weight difference.
If the weight difference is deemed to be a deadweight constant, the user can also tick the box ‘Database’. Then this correction weight will be stored in the database for use in new loading conditions. Please refer to Weight list for further explanation of the database.
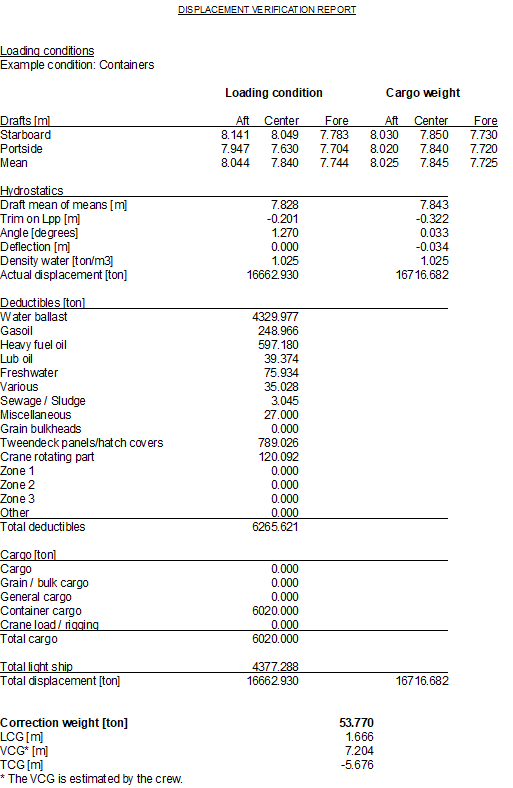
Click on OK to add the correction weight if desired and print the ‘displacement verification report’ from which an example is depicted below.
The method is also known as a draft survey. The governing idea of this method is that two loading conditions are compared. One condition is before and the other is after the (un)loading operation. The difference in displacement (resulting from observed drafts) will be the (un)loaded cargo weight. Besides a difference in cargo weight there could also be a difference in other weight items, such as ballast and consumables. To correctly calculate the (un)loaded cargo weight, these deductibles are taken into account by identifying two loading conditions in LOCOPIAS, which will be labelled ‘initial’ and ‘final’. To distinguish between cargo and deductibles, every cargo weight item must be assigned to a cargo weight group. Special care should be taken when the cargo is defined in the weight list as a free weight item, since these weight items are not automatically assigned to a weight group.
Below you find the steps that should be taken to determine the (un)loaded weight.
Go back to the [Main screen] and define the condition before the (un)loading operation, including tank fillings, configuration of grain bulkheads, cargo etc. This is later referred to as the initial loading condition.
Note: The ‘initial’ and ‘final’ qualifiers are not fixed to a particular loading condition.
Open the [Cargo weight] module again and enter the observed drafts in this condition. Details can be found in the section ‘enter drafts / freeboards’.
Now we are finished with preparing the initial loading condition.
Now go back to the [Main screen] and create a new loading condition that will represent the situation after (un)loading. This is later referred to as the final loading condition. This new loading condition could also be a copy of the ‘initial’ condition. Please go to Conditions if you need more information on how to create or copy a loading condition.
Now define this loading condition correctly, adjusting the tank fillings, grain bulkhead positions etc.
Open the [Cargo weight] module again and enter the observed drafts (or freeboards) of the (un)loaded vessel.
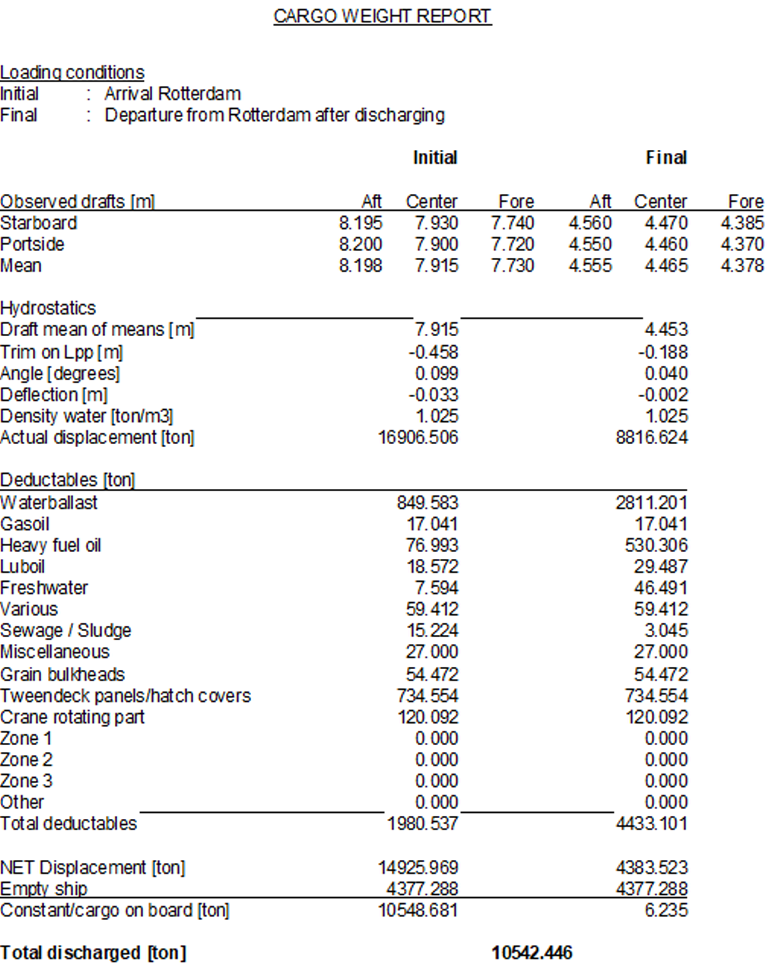
Click the [Compare load] button to produce a cargo weight determination report. You will be asked to select the initial condition. Only loading conditions where the observed drafts are entered are selectable as ‘initial’ for a weight determination computation. So if your initial loading condition is not visible, please go back to the [Main screen], switch to the initial loading condition (or create one) and follow steps 1 and 2 to set up the initial loading condition correctly. After that switch to the final loading condition again the print the cargo weight determination report.
Click on Ok to print the report from which an example is depicted below.
To read out the sensors, click the [Sensor reading] button. The read values are copied in the measured drafts/freeboards menu. The positions for which no sensor value is available, are set to Not measured. Now the read values are used to calculate the position, deplacement and correction weight.