LOCOPIAS Manual Seagoing Vessels  2024
Loading Computer Software
Miscellaneous subjects

Operation of LOCOPIAS and general functions

General functions in the menu bar are described in this section. Note that not all general functions are included in each and every menu bar. Specific options are described in the appropriate sections of the manual. Options can be selected by clicking the desired option on the menu bar or by pressing the underlined letter of the function (in combination with the <Alt>).

Help
This option opens a help reader. This is context-sensitive, so opens the manual page related to the menu or function from where [Help] was activated.
Insert
This option will insert a new row in the menu, just above the location of the text cursor. Occasionally, it might not be allowed to add a new row, for instance if the maximum number of rows has been reached. In that case nothing will happen.
New
Similar to [Insert], however now the row will be inserted just below the text cursor.
Remove
This option deletes the row of the text cursor (unless that row is not allowed to be removed).
Edit
  • Copy. This option will copy the data from the text cursor to Window's clipboard
  • Paste. To paste the clipboard content to the text cursor cell.
Window, Result windows
Choose stability, shear forces, bending moments or torsional moments to display the corresponding graph in a overlay window. These graphs give real-time feedback while loading cargo or modifying contents of tanks.
float_menus_en.png
Examples of result windows.

Content and options in the cells of selection windows and input windows

With respect to the cells of an input window, a distinction can be made between three methods of interaction;

  1. Select, i.e. go to the underlying window or menu, with <Enter> or <double click left mouse button>.
  2. Enter a free value or name, such as the vertical center of gravity for a weight item, or the name of the weight item. That value or this name can simply be typed on the keyboard.
  3. Choose from a limited number of predefined values, such as the weight group. After such a choice a popup window comes up where the selection can be made. Making a choice from predefined types is simply also a way of data input, just like the entry of a name or a number, and is therefore also invoked by a convenient key on the keyboard, such as a letter or a number, but most conveniently with an easily accessible key such as <Spacebar> or <+> or <-> on the numeric keypad — or <F5>, which leaves no trace if accidentally used in cells which do accept textual input. Working with the mouse, the choice of such a predefined type is initiated by the <middle mouse button>. A third way to invoke the selection of predefined types is described in the bold text below.

In order to indicate which of these three actions apply in a particular cell, symbols are located on the side of the cell with the most free space, that is to say, on the left if the text in the cell is right aligned, and on the right if the text is placed left. Moreover, also combinations may be possible of the three actions, such as that at a loading condition its name can be changed by typing and, by pressing <Enter>, so that this loading condition can be accessed in order to enter tank fillings and weights.

These symbolic indications are as follows:

  1. Select with <Enter>: a small triangle at the top of the cell.
  2. To choose from predefined values: a rectangle in the middle of the cell. For completeness, this rectangle is not only a passive indication that this cell contains predefined types, but also an active switch which will pop up the selection window when doubly clicked with the left mouse button.
  3. Typing text: a small triangle at the bottom of the cell.
cell_indications.png
Symbolic indications at the edges of the cell.

Preview of output to screen, and export of computation results

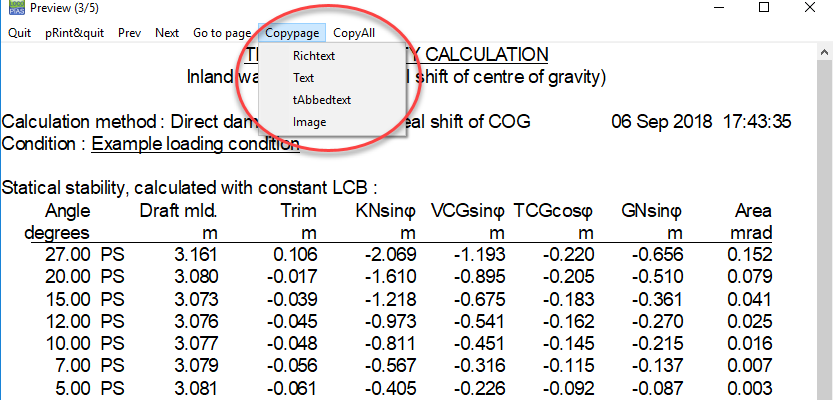
To get the LOCOPIAS output on screen, go to the menu bar of the [Main screen] and select [Setup]→[Print options] and then select ‘Preview/clipboard’.

print_options_en.png
Print options.

A preview on screen can be copied and pasted in external editing programs (e.g. Word or Paint) by means of the options [Copyall] and [Copypage]. With these functions you can paste all output or only the current page. The level of formatting of the text is determined by choosing Richtext, Text, Tabbedtext, or Image.

Richtext
Copy to clipboard in RTF, a format for word processing programs such as Microsoft Word.
Text
Copy to clipboard in a format for ASCII-based programs such as Notepad.
Tabbedtext
Copy to clipboard in a format suitable for spreadsheets such as Microsoft Excel.
Image
Copy to clipboard in image format.
output_on_screen_en.png
Preview on screen.

Definitions and units

GeneralDefinitionsEN768.png
Global definitions.
Units
Unless stated otherwise, all dimensions are in meters, volumes in m3, weights in metric tons.
App
Aft perpendicular. All longitudinal distances are related to App. If App coincides with the rudderstock, then the part aft of App has negative longitudinal coordinates, that is not peculiar.
Fpp
Forward perpendicular. Position of Fpp is fixed as App + Lpp.
Lpp
Length between perpendiculars, Lpp is the distance between App and Fpp.
Baseline
All vertical distances relate to baseline, positive upwards.
CL
Centerline. All transverse distances relate to CL, with SB being positive and PS negative.
Draft
Distance between the baseline and the waterline, measured along the vessel's vertical axis.
Mean draft
Draft at Lpp/2
Draft aft
Draft at App
Draft fore
Draft at Fpp
Trim
Draft fore minus draft aft (according to ISO 7462).
Trim at the bow
Trim at the bow has a positive value
Trim at the stern
Trim at the stern has a negative value
Density
Specific weight. The weight per unit volume of a substance, in ton/m3
Programs
LOCOPIAS Loading Computer Software and LOCOPIAS Tank Soundings are referred to as programs. They can be started independently.
Modules
Modules can be opened from the main screen of LOCOPIAS Loading Computer Software.

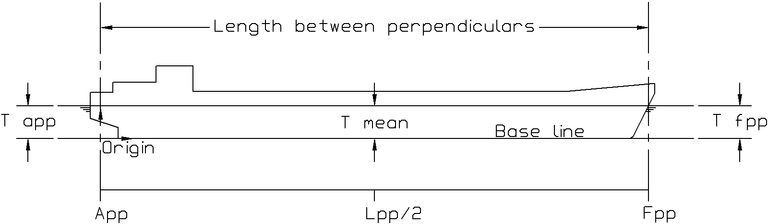
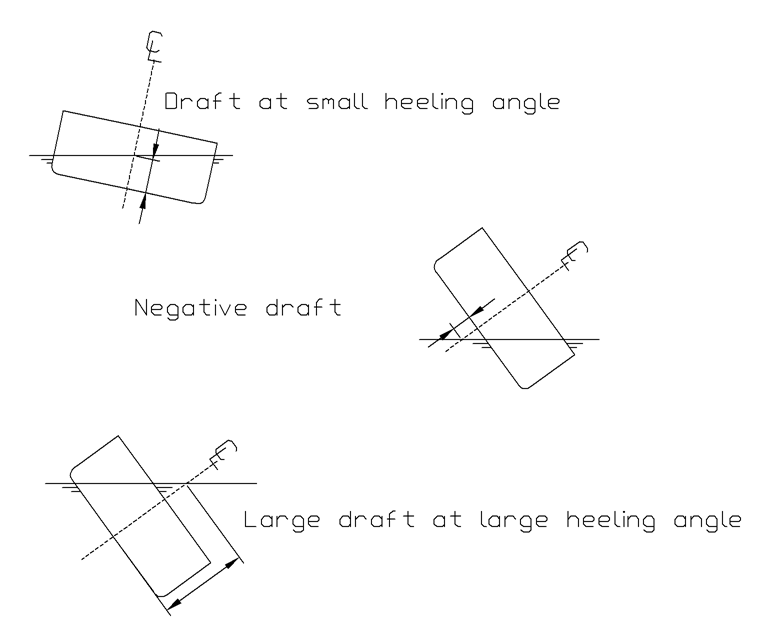
A consequence of the definition of draft is that at large heeling angles the draft may be quite large, as illustrated by the sketch below, so consequently the trim may also be large at greater angles.

largedraftsEN768.png
Examples of drafts, according to its definitions.

LCG and weight distribution of weight items

In cases where the LCG is not within the middle 1/3 of the distance between the fore and aft boundary, the line of weight distribution becomes negative at the boundaries. Sometimes this is correct (for example, in case of a crane where the center of gravity of the load is actually outside the boundaries of the crane), sometimes it is not correct. Therefore this is checked at every longitudinal strength calculation and the user will get a message where appropriate.

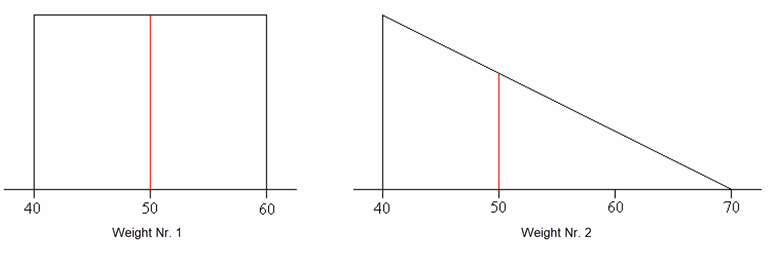
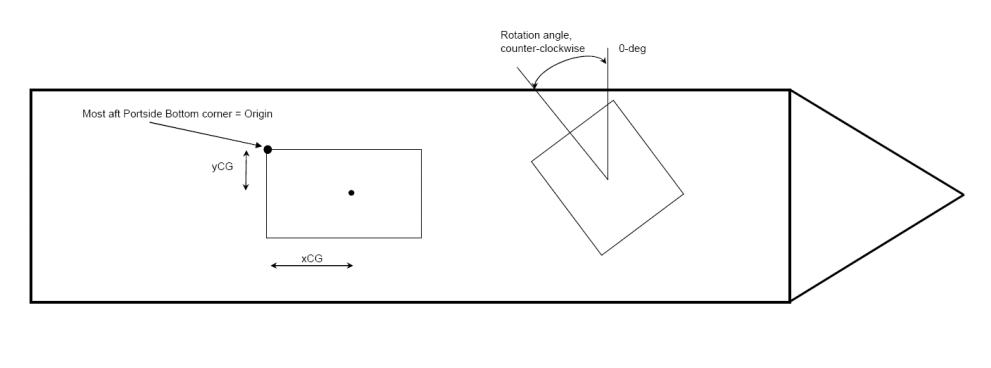
Two examples of common weight distributions:

  1. a weight item of 100 metric tons,
    • Center of gravity at 50 m
    • Boundaries at 40 and 60 m.
  2. a weight item of 75 metric tons,
    • Center of gravity at 50 m
    • Boundaries at 40 and 70 m.

The corresponding weight distributions are shown in the figure below (nr. 1 on the left, nr. 2 on the right).

loading_weight_distributionEN.png
Examples of weight distributions.

Installation of LOCOPIAS

Go to www.sarc.nl , click [Login]. Log in with your personal credentials.

After logging in you will be shown a download page with a file, in this case 'morgen1.exe'. You can download this file by left-clicking the file title. After the download finished, open the file to start the installation.

Morgenexe_downloadfile.png

The window below will pop-up onto your screen.

installation_of_LOCOPIAS_begin.png

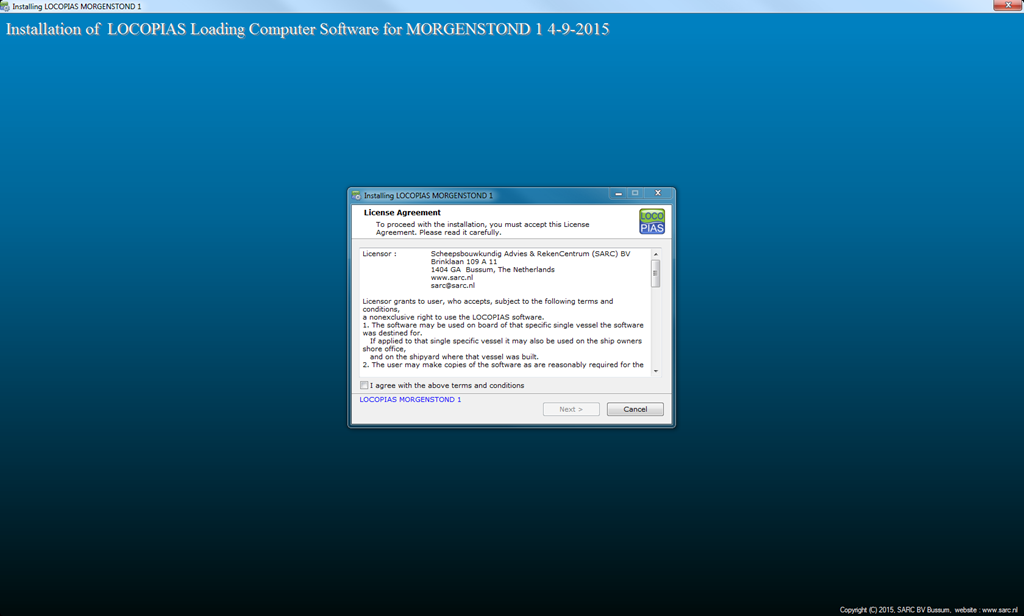
After reading the 'License Agreement', select 'I agree with the above terms and conditions', and, press [Next].

installation_of_LOCOPIAS_agreement.png

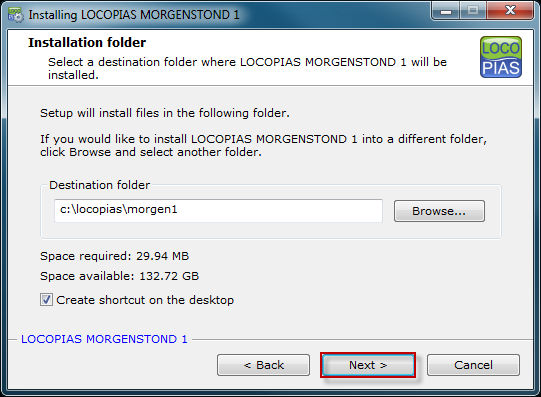
Select an installation folder, C:LOCOPIAS\ name-ship is pre-defined but not obligatory. After choosing the folder, press [Next].

installation_of_LOCOPIAS_agreement_2.png

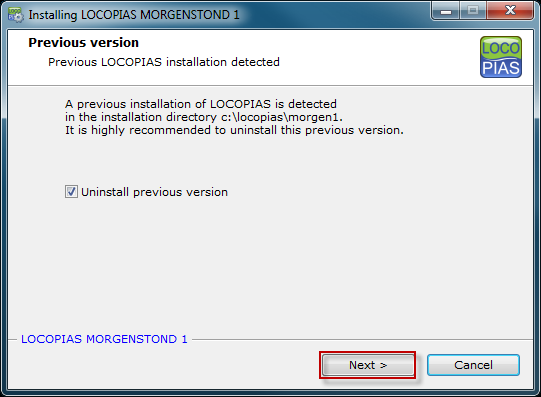
If an older version of LOCOPIAS is installed on this computer, the program automatically detects the previous LOCOPIAS and this will be uninstalled if you select the window next to 'Uninstall previous version'. After doing this, press [Next]. If you don't have an older version of LOCOPIAS , this window won't appear and you can skip to the next page.

installation_of_LOCOPIAS_previous_version.png

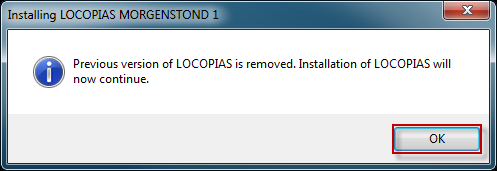
A pop-up window will appear when the previous LOCOPIAS is removed. Press [OK] to continue installing the new LOCOPIAS .

installation_of_LOCOPIAS_previous_version_ok.png

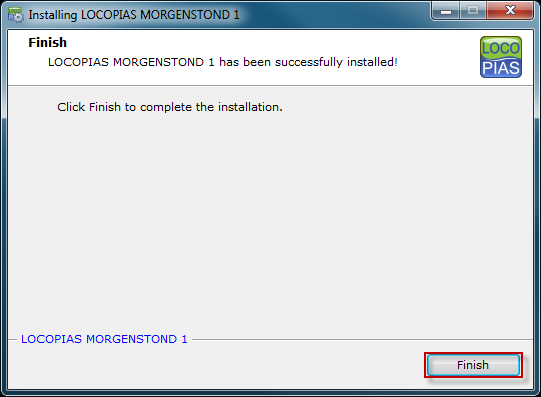
LOCOPIAS now will be installed, this will take a few seconds, If the installment is completed, the pop-up window below will appear. To finish the installation, please click [Finish].

installation_of_LOCOPIAS_finished.png

LOCOPIAS is now installed on your computer, to start LOCOPIAS please go to the folder you have selected to install LOCOPIAS or click on the shortcut which is on your desktop.

Installation command line parameters

The installation program vesselname.exe accepts the following command line parameters;

-sThe LOCOPIAS installation is performed without user interaction.
-path=LOCOPIAS will be installed in the folder specified here. The specified installation path may not contain spaces.

Example: username.exe -s -path=c:\custominstallpath

Supported formats of data exchange files

The General Cargo module of LOCOPIAS supports three formats of data exchange files:

Import CSV file

According to the CSV (Comma Separated Values) standard. An example is shown below.

SUCTION_PILE , 182 , 64.38 , 4.551 , -5.66 , 5.5 , 0.5 , 5.6 , 2.8 , 29.6 , 15.6 , 0 , HOUSTON , GULF_OF_MEXICO
REEL , 200 , 93.356 , 20.713 , 4.69 , 8.77 , 0.51 , 8.6 , 4.3 , 6.17 , 3.09 , 0 , AMSTERDAM , DUBLIN
REEL , 190 , 103.276 , 20.713 , 4.48 , 8.77 , 0.51 , 8.6 , 4.3 , 6.17 , 3.09 , 0 , AMSTERDAM , DUBLIN
PLATFORM , 200 , 64.88 , 17.741 , 0.07 , 3 , 0.5 , 20 , 10 , 20 , 10 , 0 , ST-NAZAIRE , ABU-DHABI
CASE , 230 , 106.43 , 7.121 , 5.72 , 7 , 0.5 , 5 , 2.5 , 10.76 , 5.38 , 0 , AMSTERDAM , ROTTERDAM
CASE , 500 , 108.17 , 18.291 , -6.04 , 4.1 , 0.5 , 4 , 2 , 30 , 15 , 0 , AMSTERDAM , ROTTERDAM
PLATFORM , 200 , 28.02 , 17.741 , -0.04 , 3 , 0.5 , 20 , 10 , 20 , 10 , 0 , ST-NAZAIRE , ABU-DHABI
DERRICK-BOOM-100MT , 100 , 67.2 , 3.941 , 0.78 , 4.28 , 0.5 , 4.45 , 2.23 , 56.39 , 28.2 , 0 , FENIT , BARCELONA
LIFT-SUPPORT , 1.9 , 91.46 , 2.201 , -3.88 , 0.8 , 0.5 , 2 , 1 , 7.7 , 3.85 , 0 , FENIT , BARCELONA
CASE , 52 , 106.16 , 6.621 , -5.81 , 4 , 0.75 , 5 , 2.5 , 10 , 5 , 0 , AMSTERDAM , KATWIJK
LIFT-SUPPORT , 1.7 , 35.25 , 2.201 , 4.67 , 0.8 , 0.5 , 2.1 , 1.05 , 6 , 3 , 0 , FENIT , BARCELONA
CASE , 300 , 111.14 , 6.321 , 0.15 , 5.4 , 0.5 , 3 , 1.5 , 20 , 10 , 0 , AMSTERDAM , KATWIJK
REEL , 230 , 50.194 , 20.706 , 0.11 , 14.54 , 0.307 , 8.6 , 4.3 , 10.7 , 5.35 , 0 , AMSTERDAM , DUBLIN

CSV files should be formatted as follows. Each row contains fourteen data fields representing the following information in order, separated by commas:

  1. Cargo name
  2. Weight [T]
  3. LCG [m from APP]
  4. VCG [m from BASE]
  5. TCG [m from CL, PS = “+”]
  6. Height of cargo [m]
  7. zCG [% of height, field 6] Vertical position of CoG, from the base of the cargo.
  8. Width of cargo [m]
  9. yCG [m] Transverse position of CoG (see the picture below)
  10. Length of cargo [m]
  11. xCG [m] Longitudinal position of CoG (see the picture below)
  12. Rotation angle [degrees] (see the picture below)
  13. Port of loading
  14. Port of discharge
csv_input_methode.png

Import & export VCC(Visual Cargo Care) file

The VCC file is in essence a XML file which describes the situation of all the general cargo data that is to be imported. An example of one such a cargo item, in the XML file, is shown below. This file is generated in the program called ‘Visual Cargo Care’. For more information on this product go to www.visualcargocare.com, click here for a demo of the program.

<Loading_conditions>
  <Loading_condition>
    <Loading_condition_name>Toestand 1</Loading_condition_name>
    <Loading_condition_guid>385CC14F-72D5-4B8E-A069-E658C1BAF9A5</Loading_condition_guid>
    <Weight_items>
      <Weight_item>
        <Name>Giant cargo</Name>
        <Type_of_weight_item>general cargo</Type_of_weight_item>
        <Weight>500.000000</Weight>
        <Weight_group_name>not applicable</Weight_group_name>
        <Geometrical_defined_weight_item>
          <Loaded>loaded</Loaded>
          <Length>20.000000</Length>
          <Breadth>5.000000</Breadth>
          <Height>2.500000</Height>
          <Local_longitudinal_centre_of_gravity>10.000000</Local_longitudinal_centre_of_gravity>
          <Local_transverse_centre_of_gravity>0.000000</Local_transverse_centre_of_gravity>
          <Local_vertical_centre_of_gravity>1.250000</Local_vertical_centre_of_gravity>
          <Angle_with_centreline_plane>0.000000</Angle_with_centreline_plane>
          <Group_abbreviation>CAR</Group_abbreviation>
        </Geometrical_defined_weight_item>
      </Weight_item>
    </Weight_items>
  </Loading_condition>
</Loading_conditions>

Import Excel file

With this function an Excel file can be imported. There is, however, one prerequisite: the Excel file must be formatted as a list of items, meaning a column contains the same type of data over every row. An example, column A contains the name and column B contains the weight of the item.

Via the option [Excel]→[Edit], one enters a menu where one can make new Excel formats, and give the format a distinguishable name.

A created format can be executed via the option [Excel ]→[ The given name of an Excel format]. If a format is invoked a popup window appears where one can select the Excel file that needs to be imported. If one specified a ‘Default location Excel file’, see General settings, then the popup should have jumped automatically to the specified location. After this the Excel file should be read and LOCOPIAS should process the read data. It should be noted that one should check if the Excel file was read properly and, if not, change the format accordingly.

After creating a new Excel format, one can enter the newly created Excel format where some general and format specific information must be defined.

Setting Excel format: ‘Name of format’
1.General settings
2.Column settings

General settings

A number of options with regard to importing data from an Excel file appears.

Sheet name
This name must be identical to the sheet name in the Excel file which contains the data to be imported.
Applicable to
Most of the time this setting is already set, but if one wanted to make a new format for a different module this should be set. This option can be limited to a specific module meaning that one cannot always change this option.
Start reading on row
If this is zero, than the Excel sheet will be read from row 1. If this is set to anything other than zero, it will start reading the Excel sheet from the specified row.
Start minimized
That Excel should be started minimized opposed to maximized.
Save after reading
If the Excel file should be saved after reading.
Quit after reading
If after reading the Excel file, the Excel program should be closed.
Default location Excel file
Here one can specify a location which would contain most of the time the to be imported Excel file.
Note
The options ‘Start minimized’, ‘Save after reading’ and ‘Quit after reading’ will have no effect if Excel was not invoked by LOCOPIAS.

Column settings

Here one must specify which column in the specified Excel sheet contains which type of data.

Column
This name should be identical as in the Excel sheet.
Typ column
This identifies the kind of data this specified column contains, as defined in General settings.