The General cargo module is intended for the loading of general cargo. The weight and center of gravity of the general cargo are incorporated in the loading condition, and thus included in the calculation results. Some highlights of this module are:
- Cargo can be placed on any position in the vessel, without any limitations.
- Cargo holds and compartments used for storage are visible in all views of the vessel.
- Hatches and panels can be integrated into the module and be placed freely or snap to predefined locations.
- Project cargo positioned above deck is automatically included in the calculation of the wind contour of the vessel.
- Project cargo of any dimension can be defined (LxBxH).
- A list of all cargo or a graphical cargo stowage plan on any desired horizontal section can be printed.
- At any desired moment, stability or strength particulars can be evaluated and verified against the relevant criteria.
- Note
- A video exists in which the operation of this module is demonstrated.
Layout
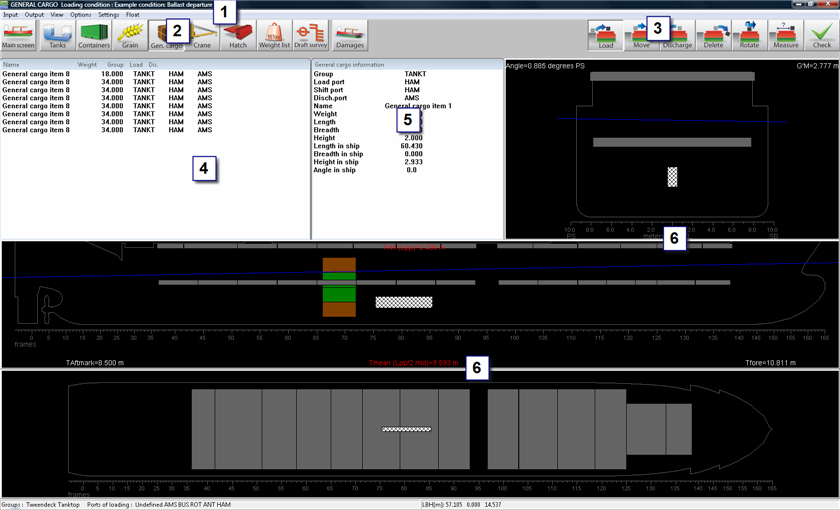
Layout general cargo module.
- 1 Menu bar
- Basic functionalities are accessible from the menu bar.
- 2 Module buttons
- These buttons navigate to another module, or back to the [Main screen].
- 3 Function buttons
- These buttons represent main functions of the [General cargo]-module.
- 4 List of cargo
- Displays the general cargo items that match the selected view options from the [View] menu. If the list is empty, there are no containers that match the selection.
- 5 General cargo information
- Shows the properties of a selected cargo item, this can be a loaded item or an item in the list 4.
- 6 Section windows
- Top view, vertical section and cross section. Views and sections change with selected cargo, sections cut through the center of gravity of the selected cargo.
General approach
- Input. The first thing to do is to define cargo and ports.
- Load. Now you can use the [Load]-button to load the cargo on to the vessel.
- Edit. After loading the cargo you can make changes to the loading condition, for instance move, discharge, rotate or delete cargo.
- Check. Use the Stability/Strength diagrams under [Window]→[Result windows] and the [Check]-button to verify the loading condition.
- Output. You can generate output specifically for this module.
Input
- Define the relevant ports by selecting the menu [Input]→[Ports].
- Defining groups (by going to the menu [Input]→[Groups]) is optional, it can be useful for instance to make a division between cargo on the tanktop and on the tweendeck.
- Select [Input]→[General cargo] to define the cargo you want to load. You can define a group, ports, name, size, weight and center of gravity of the cargo. Instead of manually entering the data in this table, it can be imported from file, by using option [File], For more information on the supported file formats please refer to Supported formats of data exchange files.
Load
|
|
- Under the menu [View]→[Group/port] you can select the cargo you want to view in the list of cargo window 4.
- Select a piece of cargo from the list of cargo.
- Left-click the Load-button 3.
- Left-click in a section window 6 to place the cargo. You can also hold and drag to position the cargo more precisely. You can place cargo at any position in the section windows. If you have enabled [Settings]→[Collision check] you will get a message if there is a collision with other cargo.
|
Edit
It is possible to edit cargo data by:
- Double-clicking the cargo in the [list of cargo]-window 4.
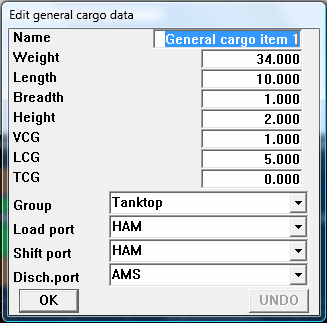
Edit general cargo data in the 'list of cargo'.
- Right-clicking the cargo in a section window 6.
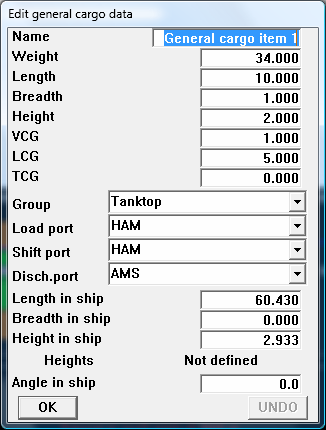
Edit general cargo in the 'section windows'.
Other ways to edit cargo are:
- Activate the [Move]-button to move cargo in the section windows. Move the mouse over a piece of cargo to automatically select it, then left-click and hold the cargo to drag it to the new position.
- Activate the [Discharge]-button and left-click the cargo in the section window to discharge. The discharged cargo appears in the list of cargo again. You can also discharge all general cargo at once or by selected port: go to the [Options] menu. When discharging cargo, this cargo will be put in the [List of cargo]. From this list it is possible to load the cargo again.
- Activate the [Delete]-button and left-click cargo to permanently remove the cargo from the vessel and from the cargo list. It's not possible to load the cargo again when the cargo has been deleted.
- Activate the [Rotate]-button to place cargo in a desired position with a certain angle.
- Activate the [Measure]-button and select two points in the section-windows to measure the horizontal, vertical and transverse distance between the two points.
Check
In Verification more information can be found about verification of the loading condition.
Output
A list of all general cargo items as defined under input can be generated through [Output]→[General cargo list]. Views and sections of the stowage plan can be defined under [Input]→[Edit cross sections stowage plan] and printed via [Output]→[General cargo stowage plan].
Hatches
If hatches are integrated into the General cargo module then several options will become available:
- The function [Snap], which will enable the snapping of hatches to one or more predefined positions.
- The option [Options]→[Hatch configuration] will open a window that allows you to store or restore a configuration of hatches, i.e. the placement of all the hatches. Storing a configuration is performed via the [New] and [Insert] options and restoring a configuration is done via the [set Configuration] option. The [set Configuration] option only works when there are no containers loaded onto the hatches. Every configuration can be given an identifiable Name and can also be Locked against accidental removal.
