- Attention
- Before using this GUI it is essential that all ship's container provisions, such as castings and bay / row / tier positions, are defined using the Cargoquip module.
The container loading module is designed to define a particular container loading.
LOCOPIAS updates the situation and informs you about the consequences for the vessel. This module is essential for vessels with a significant container capacity. It allows for the interactive positioning of containers of any size, and contains numerous loading options, amongst which electronic data exchange. Some highlights of this module are:
- The module is founded upon a 3D representation of container distribution. It allows the user to show any desired combination of rows, bays and tiers, and to work in a sequence and orientation selected by the user.
- Suitable for all kinds of containers. The module has no restrictions at all with regard to the container type (20', 30', 40', 45', 48', 52' or every other length, with random breadth and height of each container) or loading combination. Refrigerated containers are also supported.
- Drawings and lists of container loading details.
- At any desired moment, stability or strength particulars can be evaluated and verified against the relevant criteria.
- Only consistent container loading is accepted.
- Database management functions for import and export of container data and loading conditions.
- Integrates seamlessly with LOCOPIAS' line of sight module.
- Container cargo positioned above deck is automatically included in the calculation of the wind contour of the vessel.
Layout
A typical layout of the [Containers]-module is shown below. Its elements are labeled with a number and described underneath. The slots are generated automatically according to the type of container that is to be loaded.
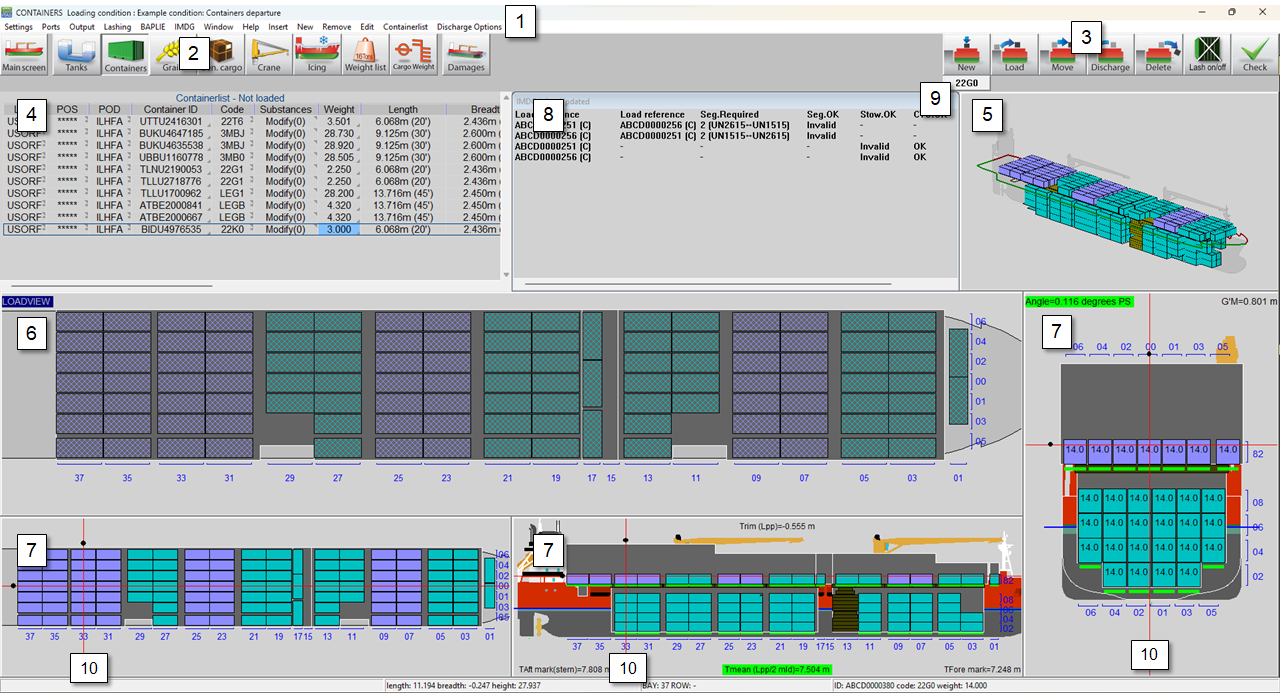
Container module.
- 1 Menu bar
Basic functionalities are accessible through the menu bar.
- 2 Module-buttons
These buttons navigate to another module, or back to the [Main screen].
- 3 Function buttons
Main functions of the [Container]-module. These functions are also mapped to a keyboard key combination, see Function keys.
- 4 Containerlist
Displays the containers that match the view options selected from the [Containerlist..]→[View] menu. You can choose between loaded, not loaded and all containers. It is also possible to copy/paste from Excel in this list.
- 5 3D View
3D view of the full vessel.
- 6 Loading view
This is the main work window of the container module. All the functions (new, load, move, discharge, delete) happen through this window.
- 7 Section windows
These windows show the layout of the bay, row and tier of the selected container as well as trim, draft, heeling angle, GM and actual waterline.
- 8 IMDG
IMDG information. If IMDG is not enabled, this window is omitted.
- 9 Container type/code button
With these button you can select the container type you want to load.
- 10 Navigation Lines
- The navigation lines are present only in the Section windows 7. Right-clicking in any of the Section windows will update the views. You can also left-click and drag the black dots.
- Note
- The bays and rows are always visible. The tiers are drawn when containers are loaded. For the tier numbering, see Tier numbering.
General approach
There are three ways to load containers with the Container module. You can load a new container with the [New]-button, you can create a list of containers and load these with the [Load]-button, or you can use a BAPLIE file, see BAPLIE. In general, the following approach can be used:
- Select. You can select (multiple) containers.
- Load.
- Edit. After loading, you can edit the data of a container, discharge a container, switch a container from one container slot to another, discharge a container to the quay or permanently delete a container.
- Check results and create output. Use the [Check]-button, or the [Window]→[Result windows] windows to verify your loading condition, then print the output.
- Output.
Select
You can select a container in one of these ways:
- Left-click a container in the List of containers 4.
- Left-click a container in the Loadview 6 or any one of the Section windows 7. All the function buttons have to be unpressed in order to select.
To select multiple loaded containers, drag cursor in one of the Section windows 7 to create a selection box. You can then right-click and choose your action from the options available. See also Multiple containers. A selected container is highlighted white.
Load
|
| Use this function to directly create a new container. You will immediately see the available slots drawn in yellow in the Loadview 6 and Section windows 7. The type/code of the new container is determined from 9. You can then left-click in the Loadview 6 on a green slot to position the new container. You cannot position a container in the Section views 7. To load multiple new containers at once, see Multiple containers.
|
|
| Use this function to load containers from the list of containers:
- Go to the menu [Ports]→[Input ports] to enter ports, and optionally a specific color.
- You can add new containers of type as defined in 9 by pressing [New] in the Menu bar.
- Edit any container data. You can also copy-paste and/or edit multiple containers at once.
- Click the [Load]-button. You will immediately see the available slots drawn in yellow in the Loadview 6 and Section windows 7. You can left-click in the Loadview 6 on a green slot to position the container.
|
Green indicators under the loaded containers in the Section views 7 turn red when the maximum loading is exceeded. You can zoom in or click on any container on the stack to check the limits. To load using a BAPLIE file, see BAPLIE.
- Note
- For the selected type of container to be loaded, you will immediately see yellow slots drawn. If you do not see slots drawn then:
- If the vessel is equipped with initial castings and the option [Initial castings] is checked in the [Settings] menu, then there are no available slots for the selected container type .
- The vessel is not equipped with initial castings.
In both situations you can still place the container on the bottom, whether with [Placement Assist] (if checked) or freely ([Initial castings] and [Placement Assist] unchecked). After the lowest container has been positioned, the castings will be automatically used for the higher tiers.
Edit
To open the [Edit container data] form, you can right-click on a selected loaded container. To edit multiple containers, see Multiple containers.
|
| Use this function to discharge containers from the vessel. Activate the [Discharge] button and left-click on the Loadview 6 to discharge the containers. The discharged containers become available for loading again in the list of containers. You can also go to the menu [Discharge Options]→[Discharge All] and select ‘Discharge to containerlist’ to discharge the entire ship at once. |
|
| Use this function to delete containers permanently from the vessel. Click the [Delete] button and left-click on the Loadview 6 to delete the container from the vessel, the container cannot be loaded again. You can also go to the menu [Discharge Options]→[Discharge All] and select ‘Delete containers’ to empty the entire ship at once. |
Multiple containers
You can load new or edit multiple containers in any one of the Section views 7.
Load new containers
While [New] button is pressed, double-click right mouse button to load the lowest tier. The specific tier to be loaded depends on which Section view was clicked.
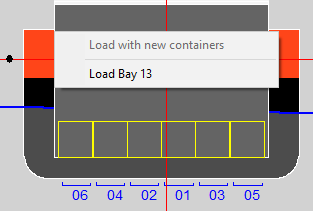
Load new multiple containers in bayview.
Edit containers
Drag cursor in any one of the Section views 7 to create a selection box. You can also hold the CTRL (Control) button and left-click on containers. The following menu will pop up after right-click:
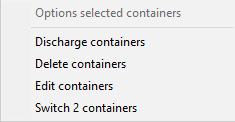
Multiple containers window.
Tier numbering
The tier numbering is done according to ISO standards. The tiers start with "02" with the height of an 8 1/2 ft standard container and rise with even numbers for each container height. Tiers on deck start with "82" and rise with even numbers above the hatch covers. Half-height containers are marked with odd numbers. Therefore containers at the same height above the keel have the same tier specification. High-cube containers are treated as standard.
Compensation pieces
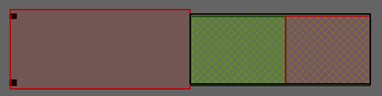
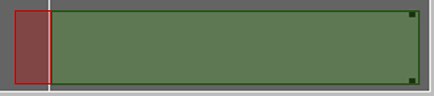
In cases where containers are to be placed in a specific position but no yellow slot appears there, you can double right-click and try to manually load the container using compensation pieces. The pieces are generated accordingly and the container is positioned. The compensation pieces are automatically removed when the container below them is removed (discharged or deleted). In case this does not occur, they can be manually deleted by the function [Delete]. For proper manual placement using compensation pieces, please refer to the visual guide with 3 examples below.
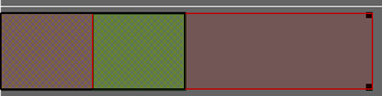
Case 1. Already loaded 20ft container is highlighted in black outline. The pieces are to be placed in the fore slot to position a 40ft container on top. Green shows the correct area to double right-click.
Case 2. Already loaded 20ft container is highlighted in black outline. The pieces are to be placed in the aft slot to position a 40ft container on top. Green shows the correct area to double right-click.
Case 3. No container is loaded underneath. A 45ft is to be loaded using compensation pieces on the fore and the raised tanktop on the aft. Green shows the correct area to double right-click.
Function keys
The function buttons are pressed/depressed when the corresponding key combination is used.
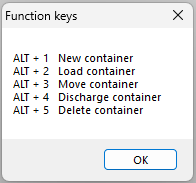
Function keys.
Menu bar
Settings
In the [Settings] submenu the following options are available:
- [Initial castings]
- You can enable/disable the bottom castings, if the vessel is equipped with them.
- [Placement Assist]
- Placement Assist aids in container positioning. The positions add up automatically to accomodate stacking. It is useful in vessels where there are no initial castings. If [Placement Assist] is off, then you can move and place the container freely.
- [Show higher tier slots]
- When loading a container, the actual selected slot is always the lowest one. You can enable/disable the display of the rest here.
- [Include stacking at extreme ends for types A-P]
- Container types A-P have additional castings, which can generate additional available slot positions. You can enable/disable the use of these additional castings here.
- [Rotated slots]
- You can enable/disable the generation of rotated slots (if they exist).
- [Edit container spacer]
- Here you can edit the container spacer. You can choose different spacers for different sections of the vessel.
- [Unit longitudinal axis]
- Here you can choose your default axis; you can choose between 20ft, 40ft, single bays, frame numbers and meters.
- [Bay-Row-Tier conversions]
- Here you can define new names for bays, rows or tiers.
- [Draw castings]
- You can enable/disable the drawing of the castings.
- [Edit overlap margin]
- Here you can allow a margin for an overlap. It is highly recommended to avoid this, unless necessary.
- [Draw cargo]
- Here you can select to display all other cargo from other modules.
- [Collision check]
- Here you can select to check for collision with other cargo upon positioning the container.
Input
In the [Input] submenu the following options are available:
- [Ports]
- Here you can insert the ports where the vessel will load and discharge containers. It is also possible to add a color to a port, this can help to organize the containers.
Output
In the [Output] submenu the following options are available:
- [Settings]
- Here you can select container colours depending on port of load, shift, discharge or container type. You can also choose what is displayed on the containers. The selections here will also be visible in the stowage plan. Explanation of coloured circles :
- red : IMDG cargo
- yellow : empty container
- blue : refrigerated container.
- [List of containers]
- Standard format output of container list with detailed container information.
Lashing
- [Select calculation method]
- Here you can choose the calculation method.
- [Reduction variants]
- Depending on the selected calculation method, you can choose from all the available reduction variants. Each reduction variant carries a predefined reduction factor. The checked reduction variants will become available for the calculations.
- [Configure settings]
- Here you can edit some settings that will be applied on every loaded baystack.
- [Baystack selection]
- Select baystacks for lashing forces.
- [Lashing calculations]
- The lashing calculations output is generated for every loaded baystack. The quick settings set in the previous entry are applied. You can work on each baystack separately by entering the [Lashing]-module.
- [Lashing plan]
- The lashing plan output is generated for every loaded baystack.
BAPLIE
With the BAPLIE option, you can read and write container data files with the BAPLIE-format (up till version 3.1).
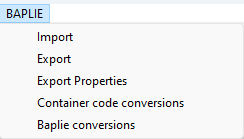
Dropdown menu options BAPLIE.
- [Import]
- After selecting an .edi file, the containers will be automatically loaded. It is possible that there are errors in the file and that some containers cannot be loaded. They will then show up in the Containerlist 4.
- [Export]
- Create an .edi BAPLIE file.
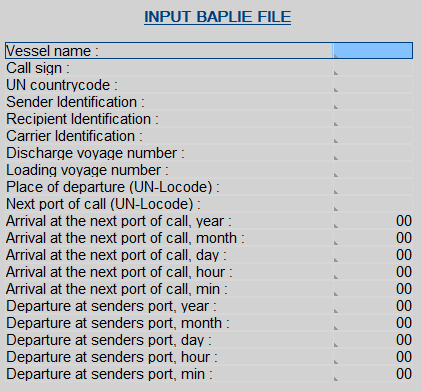
- [Export Properties]
You can enter the data for writing a BAPLIE file, see figure below. These data will be stored in a file. This information is necessary before you can [Export].
- Attention
- LOCOPIAS will only read those data which will be used in LOCOPIAS itself and write the data which will be available in LOCOPIAS. This means that after reading and writing a BAPLIE-file, some data will be lost.
Menu input BAPLIE file.
- [Container code conversions]
- This tool will convert any container codes that are non-ISO to the user-specified ISO equivalents.
- [Baplie conversions]
This tool will shift containers according to input when importing.
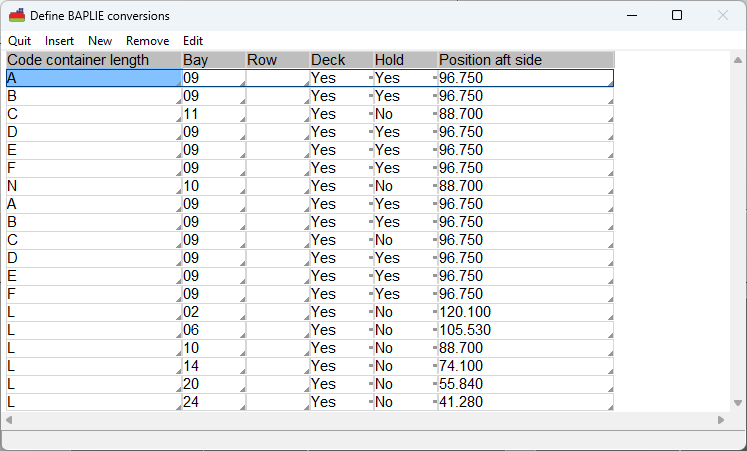
An example of the conversion tool.
In the [Code container length] entry, type the first letter of the container ISO-code. [Row] can either be left blank - meaning all the rows of the corresponding [Bay], or you can type a specific row for the shift to be applied.
Window
- Result windows
- These options are the same as in the list of weight items, see Define/edit weight items, option [Window]→[Result windows].
- Reset window view
- Reset to default zoom and scale.
Containerlist
In the [Containerlist] submenu the following options are available:
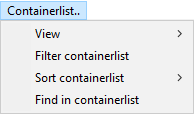
Dropdown menu options Containerlist.
- [View]
- You can choose what list you will see in the Containerlist window 4. If you choose [Loaded] and then select a container from the Containerlist, it will be highlighted in the 3D View 5 and the Section windows 7. However, the function buttons 3 will not respond. Option [All] opens in a new window.
- [Filter containerlist]
- You can choose to see only a selected type of containers, filtering by any of the 4-code digits. For example, 4*** will show all the 40ft containers, or **R* will show all the refrigerated containers. The filter can be used in all views: loaded, not loaded or all. To reset the filter, type ****.
- [Sort containerlist]
- You can sort the containerlist according to the selected column.
- [Find containerlist]
- You can find a specific container through its ID.


