The RoRo cargo module is intended to perform loading operations on RoRo cargo. The weight and center of gravity are automatically included in the calculation results of the loading condition. RoRo cargo can be positioned on all defined RoRo decks. RoRo cargo stowage plans and loading lists can be printed.
- Collision checking with other (positioned) cargo, deck outline and other defined deck obstructions.
- Integrated (user maintainable) database for storage of frequently occurring cargo items.
- Cargo can be rotated and stacked.
- Check of available deck height and maximum deck load.
- Output of stowage plan and lists of RoRo cargo.
- RoRo cargo positioned outside the basic ship wind contour is automatically included in the wind contour of the vessel.
Layout
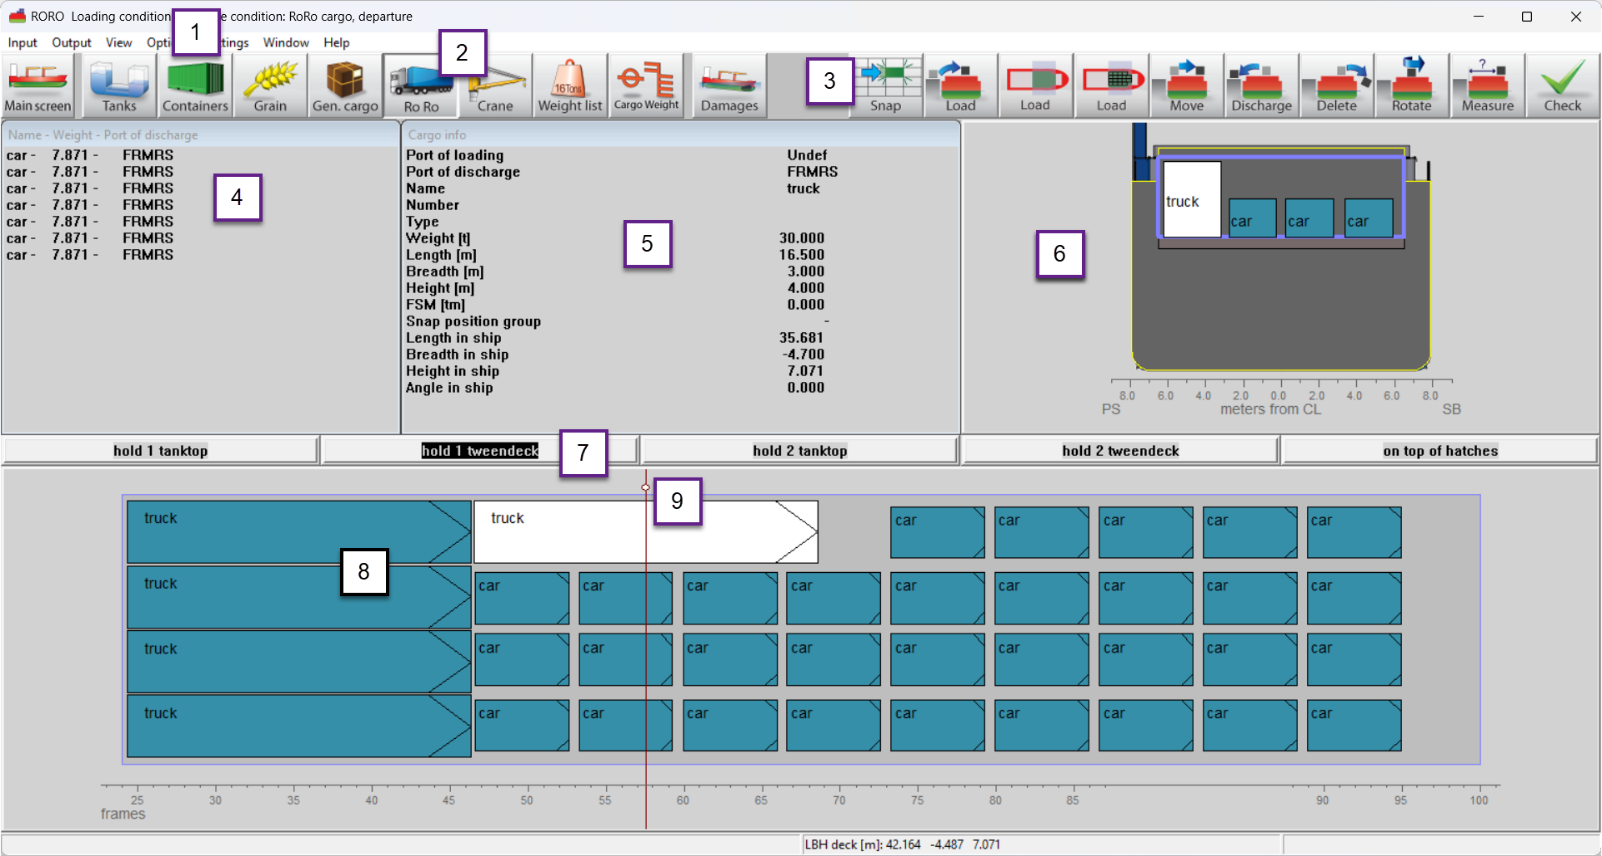
RoRo-module layout.
- 1 Menu bar
- Basic tools are accessible through the menu bar
- 2 Module buttons
- These buttons navigate to another module, or back to the [Main screen]
- 3 Function buttons
- These buttons represent main functions of the [RoRo]-module
- 4 RoRo-cargo list
- This window displays name, weight, and port of discharge of the cargo which is not (yet) loaded.
- 5 Cargo info
- Shows information of cargo selected in visible ports window.
- 6 Cross section
- Displays actual cross section indicated with a red line in top view.
- 7 Deck buttons
- Select the deck to be displayed in the top view.
- 8 Top view
- Displays the top view of the selected deck.
- 9 Marker
- Indicates the position of the cross section.
General approach
- Define ports. All relevant ports must be defined. This way it is possible to get an overview which is sorted by port.
- Database RoRo cargo. The type of RoRo cargo can be defined. This way you can pre-define the measurements, vertical center of gravity(VCD), transverse center of gravity (TCG), longitudinal center of gravity (LCG) and the maximum and minumum moments of certain types of cargo.
- Define RoRo cargo. Now a list of cargo must be compiled.
- Load RoRo cargo. Under the menu [View]→[Ports] you can choose the ports from which you want to load cargo.
- Edit RoRo cargo. You can move, rotate, discharge or delete cargo and or measure distances on deck.
- Check. Use the Stability/Strength diagrams under [Window]→[Result windows] and the [Check]-button to verify the loading condition.
- Output. The list of RoRo cargo can be sorted and printed.
Define ports
Go to the menu [Input]→[Ports], add ports by clicking ‘Insert’ or ‘New’, remove ports by clicking ‘Remove’. A color can be assigned to each port to indicate the port of discharge.

Input ports-window.
Database RoRo cargo
The built-in Database of RoRo cargo can be used to define frequently used RoRo cargo, such as standard vehicles. Up to 100 standard items can be defined to simplify RoRo cargo definition. You can adjust the database by selecting the menu [Input]→[Database RoRo cargo]. Changing an item in the database does not affect earlier defined RoRo cargo. Changing the properties of RoRo cargo defined by use of the database does not affect the standard item in the database. Min W. and Max W are input weight restrictions for RoRo cargo items which are defined using this type.
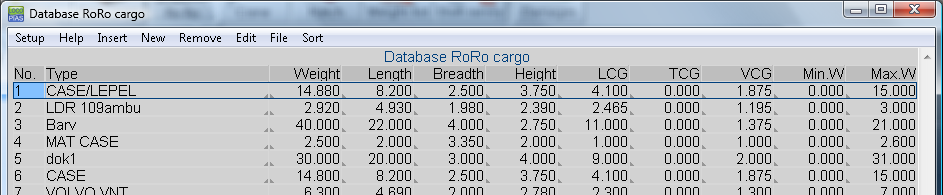
RoRo database.
Define RoRo cargo
Go to the menu [Input]→[RoRo cargo] to open the list of RoRo cargo. Add a new row to the table by clicking new or insert, then do one of the following:
- Load an item from the database by clicking in the type-column, or clicking [Type] in the menu bar and select a type from the database. Dimensions of cargo items from the database cannot be altered and weight is restricted to values applicable to that type, unless you first unlock the item with the [Unlock] function in the menu bar.
- Create a new RoRo cargo item by clicking in the ID name-column and enter a name. Now you can specify all characteristics, including the dimensions of the cargo, the Type-cell remains empty.
Snap
This function can be made available on request.
Load RoRo cargo
- Select visible ports of loading from the menu [View]→[Ports].
- Select a command. Click [Load]-button 3.
- The first piece of cargo is automatically selected, but you can also select a different cargo item in the RoRo-cargo list 4.
- Select the deck to be loaded with the [Deck]-buttons 7.
- Click and hold the left mouse button in the top view window 8, the cargo is now connected to the cursor and can be moved around on deck, on release of the left mouse button, the cargo is loaded on the deck.
- The next item in the list is automatically selected.
While loading, automatic checks are performed for free height over deck, positioning within deck contours, and intersections with other cargo items on deck. Furthermore, you can choose to see cargo from other modules in the view window by enabling the option [Settings]→[Draw cargo]. The function ‘Collision check’ verifies if there is a conflict between RoRo cargo and cargo from other modules. The function can be enabled or disabled under [Settings]→[Collision check]. To show the lashing points, go to [Settings]→[Show lashing points]
Load area fill
When this function is selected, user can drag an rectangle area. The selected area will be trimmed by the deck contour and possible defined obstacles on the deck. The selected area, with LCG and TCG is visible in the status bar (right bottom). When the mouse button is released, a popup is shown that shows, or allows definition of:
- The area to be loaded
- LCG and TCG (centroid of the area to be loaded)
- A user defined descriptive name
- A total weight for the selected area can be defined:
- Directly
- The weight per item and the number of items
- The height of the cargo
Note that the center of gravity will be: \( \text{deck height} + \frac{1}{2} \times \text{height of the cargo} \)
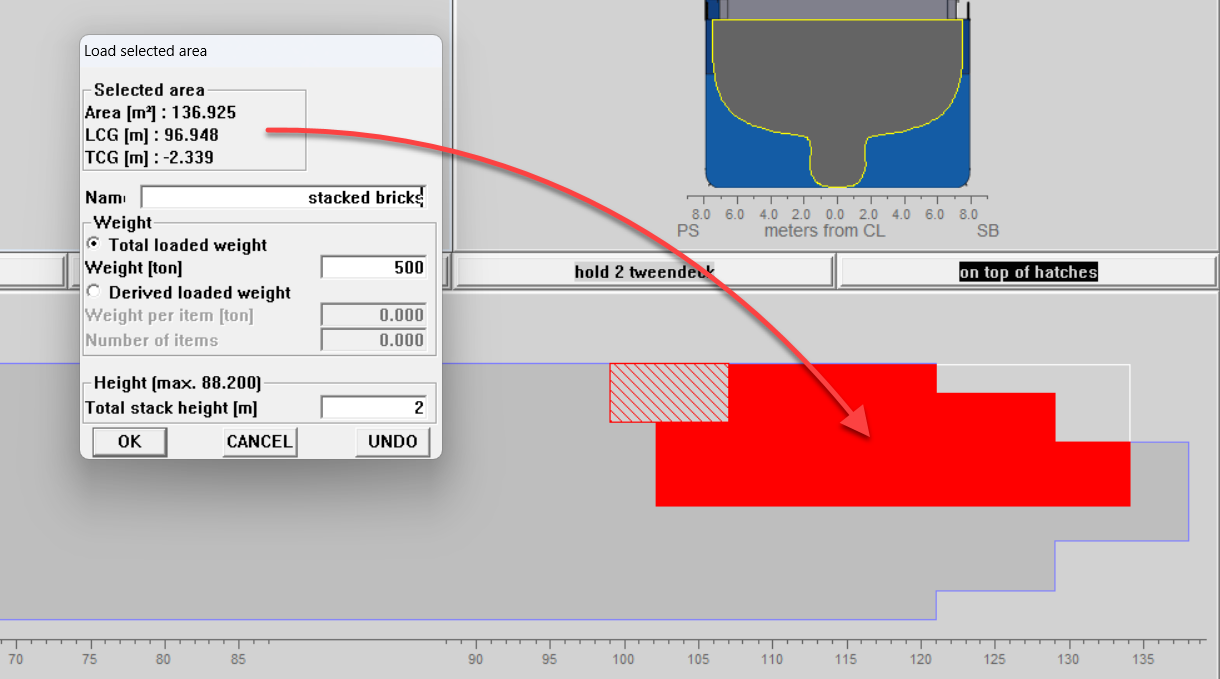
Drag rectangle and select area
After clicking OK, a new weight item is now created, as per user input and calculated area. If other cargo is in the selected rectangle, loading of the area is not permitted.
Load area items
On first selection of this function the user selects a defined database item from the RoRo database (this is different from the load list).
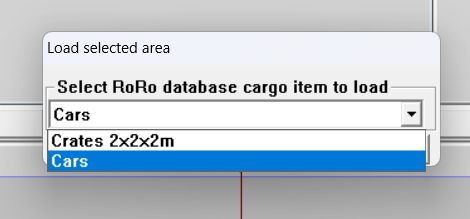
Selection of a database item for the load area items function
After selection, the user can drag a rectangle, which contains a regular grid of cargo items with dimensions equal to the database item, plus a margin of 20mm in both directions.
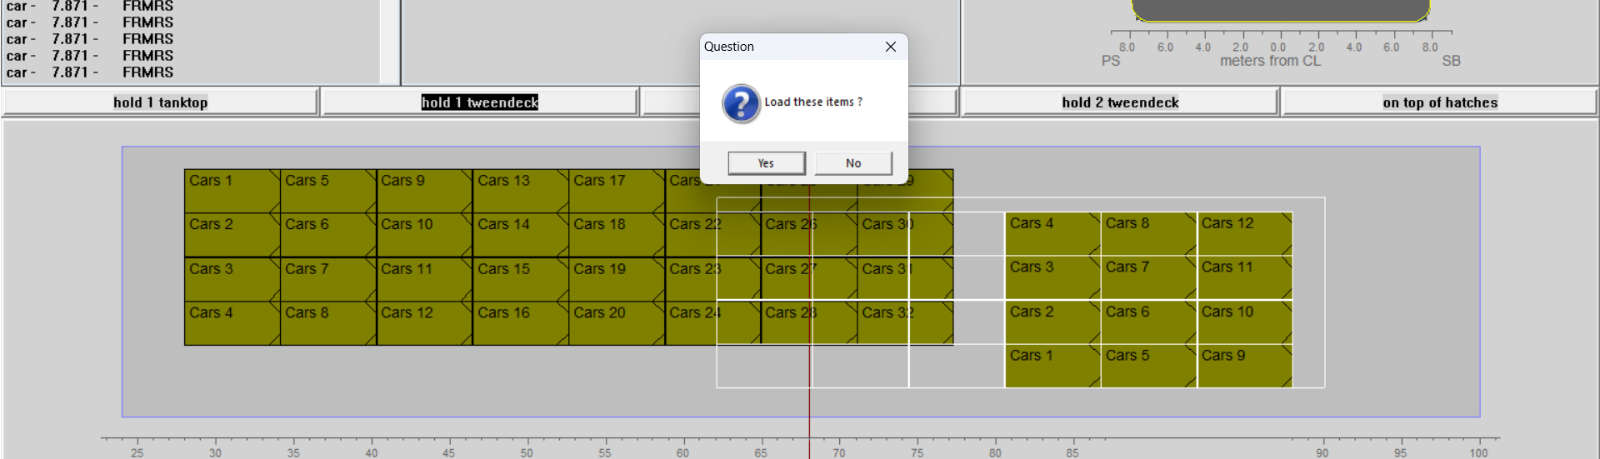
Drag rectangle with cargo items to load
Once the mouse button is released, each cargo item is checked and drawn where loading is possible. Cargo items will be placed after user confirmation in a popup window. For each loaded item a new weight item is created. Items to be placed using this function are NOT taken from the list of defined RoRo cargo ashore (load list).
Edit RoRo cargo
Double click a cargo item in the [RoRo cargo]-list 4, or right-click an item in the top view 8, to open the [Modify data]-window. Here, you can edit data and unlock a database-item as explained above.
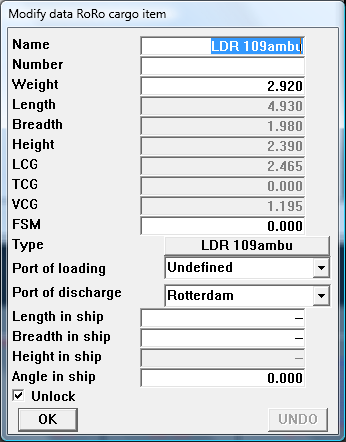
Modify RoRo data-window.
To edit the positioning of a RoRo item, use the function buttons 3:
|
| Move
Use this function to shift cargo on deck in the top view.
|
|
| Discharge
Use this function to discharge items back to the list of RoRo cargo 4. Click the [Discharge]-button 3 and select a deck, now left-click in the top view 9 to discharge items back to the list of RoRo cargo 4. You can also discharge all positioned cargo from all decks at once by choosing [Options]→[Discharge all].
|
|
| Delete
Use this function to permanently remove cargo from the vessel, without placing it back in the cargo list, click the [Delete]-button 3. To permanently delete all positioned cargo, go to [Options]→[Delete all].
|
|
| Rotate
Use this function to rotate cargo items. Click the [Rotate]-button 3. The position of the center of gravity and the angle are automatically calculated in the stability results of the loading condition.
|
|
| Measure
Use this function to measure the distance between two points in the top view. |
Check
Before printing output, you can check the loading condition [Check]. For information about the Check function see Check.
Output
Under the [Output] menu you can choose output of loaded cargo sorted by port of loading, port of discharge, deck, ID number, ID name. You can also print an overview of unloaded cargo sorted by ID number, or ID name. Finally, it is possible to print a cargo plan, showing a view of the loaded cargo on each deck.
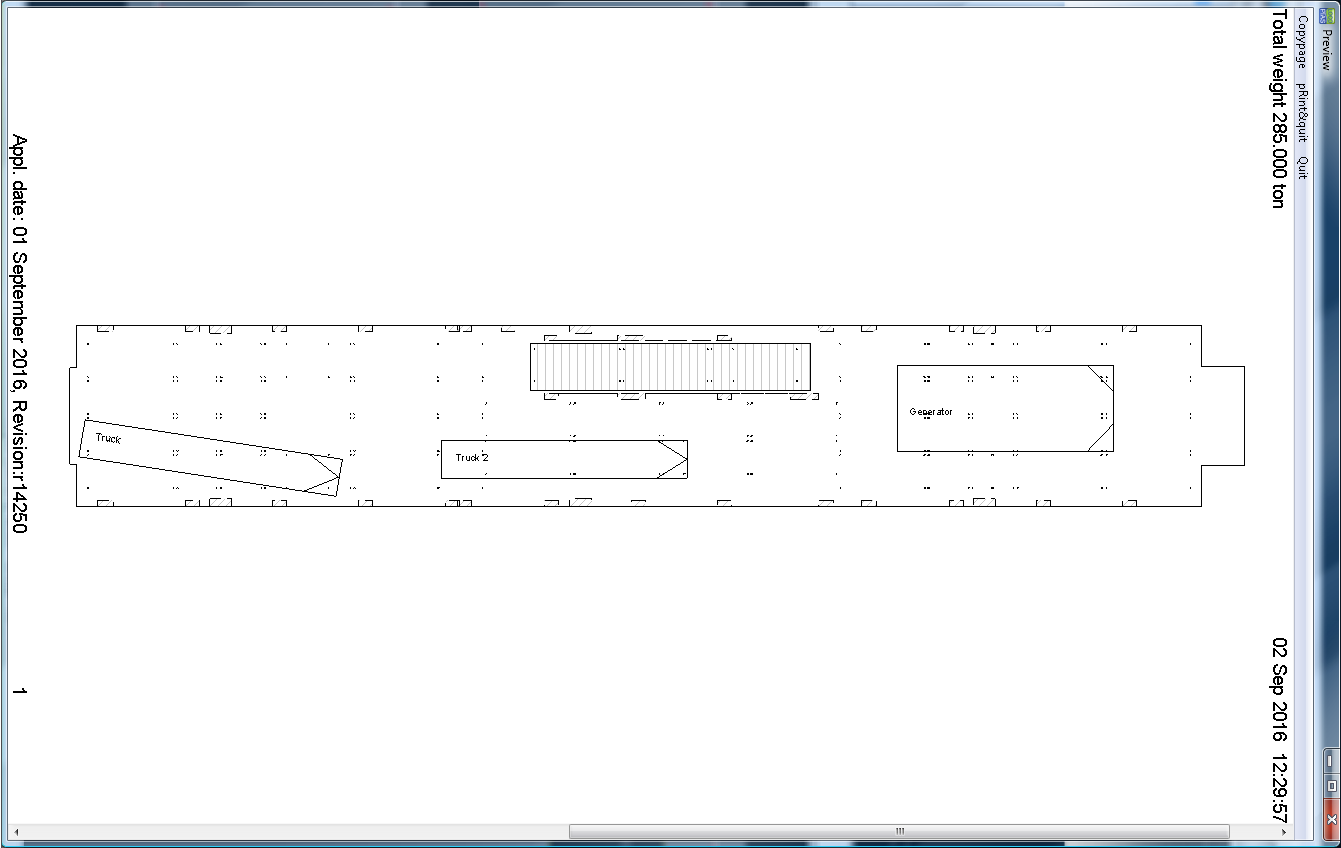
Output cargo plan per deck.