- Attention
- In 2021, this module has been replaced by a brand new container module, which is discussed in the next section.
The container loading module is designed to define a particular container loading. LOCOPIAS updates the situation and informs you about the consequences for the vessel. This module is essential for vessels with a significant container capacity. It allows for the interactive positioning of containers of any size, and contains numerous loading options, amongst which electronic data exchange. Some highlights of this module are:
- The module is founded upon a 3-D representation of container distribution. It allows the user to show any desired combination of rows, bays and tiers, and to work in a sequence and orientation selected by the user.
- Suitable for all kinds of containers. The module has no restrictions at all with regard to the container type (20', 30', 40', 45', 48', 52' or every other length, with random breadth and height of each container) or loading combination. (refrigerated containers are also supported).
- Drawings and lists of container loading details, either sorted by bay, row or tier.
- At any desired moment, stability or strength particulars can be evaluated and verified against the relevant criteria.
- Alarm on exceeding maximum stack load.
- Only consistent container loading is accepted. For instance, containers can only be placed where the slots underneath are also occupied.
- Database management functions for import and export of container data and loading conditions.
- Integrates seamlessly with LOCOPIAS' line of sight module.
- Container cargo positioned above deck is automatically included in the calculation of the wind contour of the vessel.
- Note
- A video exists in which the operation of this module is demonstrated.
- Loading, moving or discharging
- To load, move or discharge containers, make sure you have selected a function button 3. Otherwise LOCOPIAS will not respond to your command.
Layout
A typical layout of the [Containers]-module is shown below. Its elements are labeled with a number and described underneath.
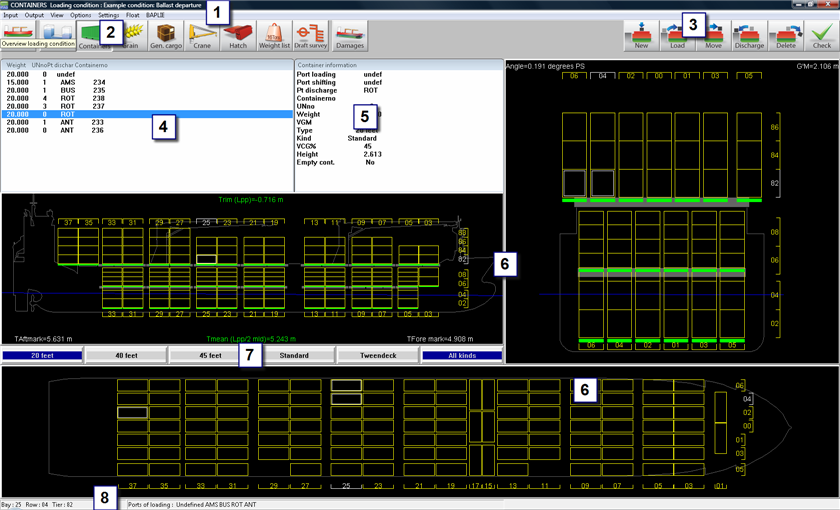
Container module.
- 1 Menu bar
Basic functionalities are accessible through the menu bar.
- 2 Module-buttons
These buttons navigate to another module, or back to the [Main screen].
- 3 Function buttons
Main functions of the [Container]-module.
- 4 List of containers
Displays the containers that match the view options selected from the [View] menu.
- 5 Container information
Shows the properties of a selected container, this can be a loaded container or a container in the list of containers 4. Container information in this window can be edited by double-clicking it.
- 6 Section windows
These windows show the layout of the bay, row and tier of the selected container (slot) as well as trim, draft, heeling angle, GM and actual waterline.
- 7 Container type/kind buttons
With these buttons you can select the container type you want to load or discharge.
- 8 Status bar
- Gives information about the selected container slot and ports.
General approach
There are three ways to load containers with the Container-module. You can load a new container with the New-button, you can create a list of containers and load these with the [Load]-button, or you can use a BAPLIE file, see BAPLIE. In general, the following approach can be used:
- Select. You can select (multiple) containers as well as empty container slots.
- Load. It is possible to load new containers, to load containers from the list of containers or to read a BAPLIE file (Selection of slots is not necessary when reading a BAPLIE file).
- Edit. After loading, you can edit the data of a container, discharge a container, switch a container from one container slot to another, discharge a container to the quay or permanently delete a container.
- Check results and create output. Use the [Check]-button, or the [Window]→[Result windows] windows to verify your loading condition, then print the output
- Output.
Select
You can select a container (or container slot) in one of these ways:
- Left-click a container in the List of containers 4.
- Left-click a container or slot in one of the Section windows 6.
To select multiple containers or container slots, activate a function-button and perform one of the following tasks:
- <Ctrl + left-click> in a Section window 6.
- <Ctrl + a> to select all containers or slots in the Section window 6.
- Drag cursor to create a selection box.
- <Ctrl + selection box> to add a group of containers to your selection.
Load
|
| Use this function to directly create a new container. You can left-click a selected slot to create and load a container with the same properties as the previously loaded container. |
|
| Use this function to load containers from the list of containers:
- Go to the menu [Input]→[Ports] to enter ports, and optionally a specific color.
- Choose the menu [Input]→[Containers] to enter container data.
- Under the menu [View] you can choose which containers you want to see in the ‘list of containers’ window. This way you can make a list of the containers you want to load, based on container length, type, and port of loading.
- Click the [Load]-button and select a slot, now left-click the selected slot to load a container from the list. Note that it is not possible to place a container in a slot when there are not enough containers under the slot. You can go to the menu [Settings]→[Check loading/discharging] to turn off this check and load in random order. Green indicators under the container slots (in the views 6) turn red when the maximum loading is exceeded. To load multiple (new) containers, see Multiple containers.
You can also load entire bays, row, or tiers under the menu [Options]→[loading options].
|
Edit
To open the [Edit container data] form, you can right-click on a loaded container or double-click a container in the list of containers. To edit multiple containers, see the section about ‘Multiple containers’ below. You can select the fill color of the containers under the menu [Settings]→[Color container].
|
| Use this function to discharge containers from the vessel. Activate the [Discharge] button and left-click a selected slot to discharge the containers. The discharged containers become available for loading again in the list of containers. You can also go to the menu [Options]→[Discharge] to discharge per row, bay or tier, or to discharge the entire ship at once. |
|
| Use this function to delete containers permanently from the vessel. Click the [Delete] button to remove a selected container from the vessel, the container cannot be loaded again. |
Multiple containers
Activate a function button and create a multiple selection in one of the section windows as explained above in Select. Now right-click to open the ‘multiple containers’-window and choose an action. The following menu will pop up:
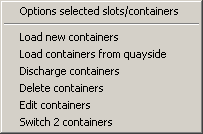
Multiple containers window.
Menu bar
Input
In the [Input] submenu the following options are available:
- [Containers]
- Here you can insert containers with certain specifications. It is also possible to copy/paste from Excel in this list.
- [Ports]
- Here you can insert the ports where the vessel will load and discharge containers. It is also possible to add a color to a port, this can help to organize the containers.
Output
In the [Output] submenu the following options are available:
- [Loaded containers]
- This window shows the number of loaded containers and the weight per type, as well as the total weight of the loaded containers.

Output of loaded containers.
- [List of containers]
- Standard format output of container list with detailed container information.
- [Load/discharge-list]
- An overview of loaded/discharged containers per port.
- [Bay plan]
- Selected bay(s) will be printed according to the print settings.
- [Tier plan]
- Selectect tier(s) will be printed according to the print settings.
BAPLIE
With the BAPLIE option, you can read and write container data files with the BAPLIE-format (up till version 3.1). After reading a data file, it is possible that there are errors in the file and that some containers cannot be loaded. You can check these containers with the option ‘Not loaded containers’.
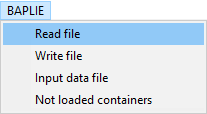
Dropdown menu options BAPLIE.
With the option ‘Input data file’ you can enter the data for writing a BAPLIE file, see figure below. These data will be stored in a file.
- Attention
- LOCOPIAS will only read those data which will be used in LOCOPIAS itself (see input containers menu) and write the data which will be available in LOCOPIAS. This means that after reading and writing a BAPLIE-file, some data will be lost.
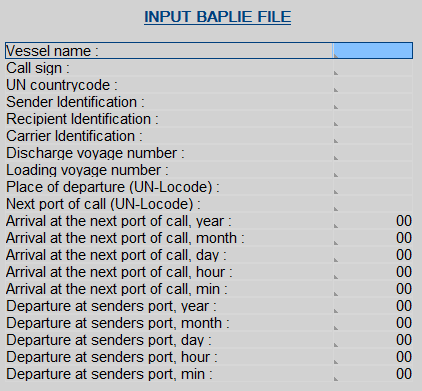
Menu input BAPLIE file.
Result windows
See Result windows.


