The usual way of making or simulating a loading is that the user wants to achieve a particular objective, such as a maximum draft or maximum cargo weight, and then ‘plays’ with cargo and ballast in order to achieve that. With this ‘ballast advice’ feature that process is partly automated: the user specifies the goal and boundary conditions, and PIAS ‘plays’ with the ballast quantities in order to get that fixed. The word ‘ballast advice’ should be interpreted somewhat broader, also the fuel can be included in this process.
In this ballast advice process two concepts play a role:
- Boundary conditions which are the loading parameters to be achieved, or whose limits are indicated. Such as minimum draft, maximum heel etc.
- In general, an abundance of loadings will exist for which the conditions can be fulfilled, but only one of them is optimal. This is specified by the optimization target, e.g. the goal ‘minimum amount of pumped ballast water’ (which is actually an interpretation of the underlying goal ‘to achieve the desired loading in the shortest possible time’).
The advice process searches the ballast quantity that fulfils the boundary conditions, and which is optimal from the perspective of the optimization target. The operation is located in two places: the settings for a specific ship, and the actual determination of the amount of ballast water in a loading condition. We start with the latter.
Determining the amount of ballast water in a loading condition
The ballast advice function is invoked with the ballast advice icon in the GUI (which is discussed in Main window layout). First, an intermediate window comes up, which shows all the tanks that can be used to achieve the desired state. Initially, all tanks are switched on, implying that from each of those tanks the content can change. If that is not desired for some tanks these can be unchecked. Next comes an input window where boundary conditions and optimization target can be set, the figure below shows an example.
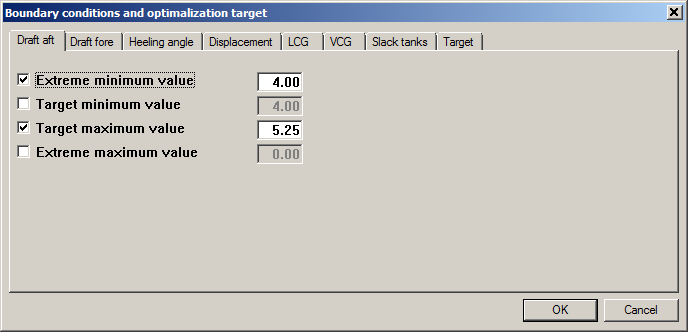
The ballast advice input window.
In this window, you can specify numerical boundaries for six parameters: draft aft, draft forward, heel, displacement, LCG and VCG, actually a desired value (target value) and an extreme value. These can be a maximum and a minimum, so for each boundary condition four values can be given. The difference between target and extreme value is simply that the extreme is far more stringent than a target. If only a single boundary condition is used there will be no difference between the result with a target value and with an extreme value. However, if multiple boundary conditions are used, a global solution will be searched, in which all boundary conditions are fulfilled as much as possible. In such a case it is possible that not each and every boundary condition is rock solid, in which case that one can be set to ‘target’. This may increase the efficiency of the solution. In addition, there is also a boundary condition ‘slack tanks’, where you can specify the maximum number of simultaneous slack tanks. Some stability rules impose a maximum on that.
The last tab of the input window contains the optimization target, one of these five:
- Minimum volume of pumped ballast water. Ballast water can, of course, be taken in from or discharged into the sea.
- Switched off, i.e. there is no target at all; the first solution that meets the boundary condition(s) is then taken.
- Minimum volume of pumped ballast water, with fixed deplacement. This solution could also be found by using the first target, combined with constraints on the displacement, but then for each loading condition the desired displacement should be specified. In this way, it is easier.
- Minimum volume of pumped ballast water with fuel volume given below. Here the boundary conditions are not met by just changing ballast, but also by the distribution of fuel over the fuel tanks. The total fuel volume can be given on the next line of this tab. This ‘fuel’ option is only present in this window if the setting (in the next paragraph) actually specifies that fuel tanks are involved in the ballast advice procedure.
- Minimum resistance. If the module Trim optimization is active, this optimization target can be selected to get a ballast advice which results in the trim and displacements combination that minimizes the resistance of the vessel. The dataset and internal procedures of the trim optimization module are used to achieve this.
Finally, in the last tab a check box ‘Calculate ballast advice’ is available. This must be switched on in order actually compute the advice. The background of this box is that the calculation of the advice might take a considerable amount of time, so that it may be desirable to leave this input window without calculation. And that can be achieved by unchecking this box. If the ballast advice has been calculated then the conclusion will be printed (or, alternatively, displayed as preview on screen, and the question is asked whether the loading conditions must be adjusted in accordance with the advice. If done so, the original is lost. If that is not desired you should make a copy in advance.
On the ballast advice as such some more remarks can be made:
- You can use as many boundary conditions as you like, but please consider that the solution is found iteratively. With as result that the computation time can increase significantly with the use of many boundary conditions, especially when those are nearly or completely contradictory. If there is no solution (anyway, if none is found), then that is reported, but no feedback is given on the reason thereof. As is common with iterative search methods.
- Calculating the advice may require a huge number of intermediate steps, and can sometimes take a long time. If that is deemed undesirable, it is recommended to avoid combinations with other calculation-intensive options, such as ‘shift of COG of liquids’, as much as possible. Another possibility to decrease the computation time is using only the major tanks and skip the small ones.
- Tanks within a ‘tank combination’ are filled to the same level. If this combination contains a port and starboard tank it will not be possible to neutralize a heeling angle with this combination.
Ship-specific settings for ballast advice
These are given from the Loading project settings menu, as these are discussed in Loading project settings and tools and Settings for ballast advice. The basic concept here is the ‘tank combination’, which is a group of one or more tanks which are equally filled. Usually, such a tank combination will contain a single tank, but it is known a priori that tank fillings must be equal, for example to prevent heel with a SB and a PS tank, then those can be taken together in one tank combination. With the first option of this settings window, the tank combination definition window is opened, where for each combination can be specified:
- The first column is a number, which is simply an automatically generated sequence number, which has no further function. With <Enter> one goes one menu deeper, and enters a compartment list where with ‘Yes’ or ‘No’ it can be specified which compartment(s) belong to this tank combination.
- The tank type, which indicates the contents of the tank combination, choice of ballast water or fuel oil.
- The relative importance, which indicates the importance of this tank combination compared to the other combinations. By default this equals one, implying that all tanks are equally important. This tank interest relates to the optimization target; suppose that this target is ‘minimal amount pumped ballast water’, and the tank importance tank is zero, then this tank is not included in the calculation of the total amount of pumped ballast water. Is the tank importance e.g. 100, then its influence is compelling if its water quantity changes. If a tank has, for example, a thin pipe line and a pump of limited capacity, then it will be advantageous not to transfer much water in or out of the tank, so the tank importance should be set high. Conversely, if the tank is used by preference then the tank importance is low. Please avoid giving all tanks an importance of zero, because then there is no effective optimization criterion anymore, and the final solution will be completely arbitrary.
- Slack, indicating whether the tanks of this combination should be included in the boundary condition ‘number of slack tanks’. One could wonder why explicitly assign this property, after all “slack is slack”? The reason is that it may be defendable to exclude small tanks, with negligible free surfaces, from the count of slack tanks. This can be done by setting this ‘slack’ parameter to ‘no’.
With the second option from the settings window a check box pops up, where it can be specified which boundary conditions are offered when calling the ballast advise function.
- Draft aft (on APP).
- Draft fore (on FPP).
- Heeling angle (which is the absolute value, regardless whether heel is to PS or to SB).
- Displacement.
- LCG, longitudinal center of gravity.
- VCG, vertical center of gravity.
- The maximum number of slack tanks.